

If you’re planning on doing a new route then how many bolts should you bring? Well if weight is not a problem, but you aim to climb very long pitches to keep the hole count down, then think about one 10 mm bolt for every 20 metres.
This means for an El Cap sized wall you’d start off with fifty bolts, giving you an average of a two bolt belay every forty metres, where in reality some belays would be natural, while some would be longer or shorter, or only feature a single bolt. For rivets this would depend on what kind of wall you’re looking at climbing. For a big wall like the Nose you may not need any lead bolts or rivets, but for some futuristic route you might want to take fifty 8 mm bolts.
Of course these are traditional bolt numbers for traditional belays, and instead you might want to employ a mix of removable bolts and 10 mm bolts, perhaps only having one 10 mm bolt per belay and an 8 mm removable bolt, and bolt ladders using 8 mm removable bolts with a few 8 mm bolts as protection, cutting your bolt load by over half.
Belay Bolt Positioning: Always place bolts with total focus on their practical positioning. Placing bolts at head height when standing on a big ledge may be easy for you, but not practical for the hauling later on, the haul line running over the lip of the ledge. Would higher belay bolts be better (on a narrow ledge), or would a belay placed off the end of the ledge be more practical (you can place extra bivvy bolts on the ledge later)?
Think about where the bags will be coming up when hauling, and ideally you want to position bolts where the bags will be free hanging all the way. A great example of bad belays and good belays is the Peanut ledge on Zodiac, where you can set up two different hauls, one where the rope is running down a slab (easy to set up but horrible to haul), while the other has the bags free hanging the whole way (harder to set up but easier to haul).
Remember you’re creating a work of art here. If you’re drilling bolts or rivets for a big portaledge camp (2 portaledges), remember that unless you want them to hang side by side (ideal, but not easy to drill for unless you have a natural ledge to stand on), then having the second ledge bolt placed a little over half a ledge away, and hanging that ledge a little lower, is fine (as stated, drilling bolts six feet apart on a blank wall isn’t easy!).
Where To Bolt Your Belay: I would advise that leaders try and bolt at the very end of their ropes, making pitches as long as possible. This increases the sustained nature of the climbing, reduces the hole count, and makes hauling faster. Often this will not be possible, as features will come up mid pitch that demand a belay be taken, so try and factor these into your plan, say having two thirty five metre pitches instead of one sixty metre pitch then a ten metre one to a ledge. When picking an actual spot to drill take into account the follow details.
Are You Drilling Into The Mountain?
Bolts must go into the heart of the mountain, not just into its skin or some flimsy flake or feature. Be very aware of just what it is you’re drilling into as it’s easy to end up with everyone hanging on some house size flake that’s only attached by a skin flap of rock. As with expanding or loose rock use your hammer to check that features are sound and check around for hairline cracks.
Where Does The Next Pitch Go?
If you’re pushing a hard line and the next section is twenty feet of birdbeak tips, do you want to be belaying right in the lead- er’s fall line when you could have had a belay just out of the danger zone? A fall into space is much safer for everyone than having someone smash into your head or having a haul bag check your fall.
Is It Loose?
Loose rock is the biggest danger to everyone on a wall, both leader and belayer, so if it’s possible having a belay set out of the danger area is vital. If you’re climbing a crack and need to drill a belay, going left or right of the crack might mean the difference between life and death.
Roofs Are Good
A belay set under a roof provides protection from storms and runoff, rock fall, and sun, and so is an ideal place to build a belay. This must be balanced with the next pitch, which may have to be shortened due to the drag of crossing a roof.
Is it a Classic?
Some belays are just meant to be where they are, and can be counter-intuitive, such as the space station on the Sea Of Dreams, situated on the lip of a roof, so your legs hang down, your knees banging as you haul. It’s a stupid belay, but also funny and memorable.
Ledges Are Always Good
Any ledge, no matter how small, is always welcome on a wall, be it king-sized or foot sized. Just remember to drill your bolts high enough so you can stand on it when hauling (you can lower your haul point but you can’t lift up a belay).
How Many Bolts Does A Belay Need?
In good rock, two bolts should suffice, as a single 10 mm bolt should be strong enough to hold the whole team, so two provides some redundancy. Bolts should be placed around a metre apart so that the belay can be kept as uncluttered as possible, but if a metre is too difficult, then just drill the second bolt as far away as you can comfortably drill.
For bivvy belays you will need three bolts in order to spread everything out, with two being for the belay and the third being for the portaledge. This third bolt can be a modern rivet, but a bolt is better. Remember you may have two portaledges hanging from that single point (backed up from the belay).
If you’re climbing capsule-style and can make a mixed belay with one bolt and one piece of trad gear, then do so, as you will then be able to fix ropes to the bolt as you progress and reduce the number of bolts used on the climb.
EMERGENCY BOLT KIT
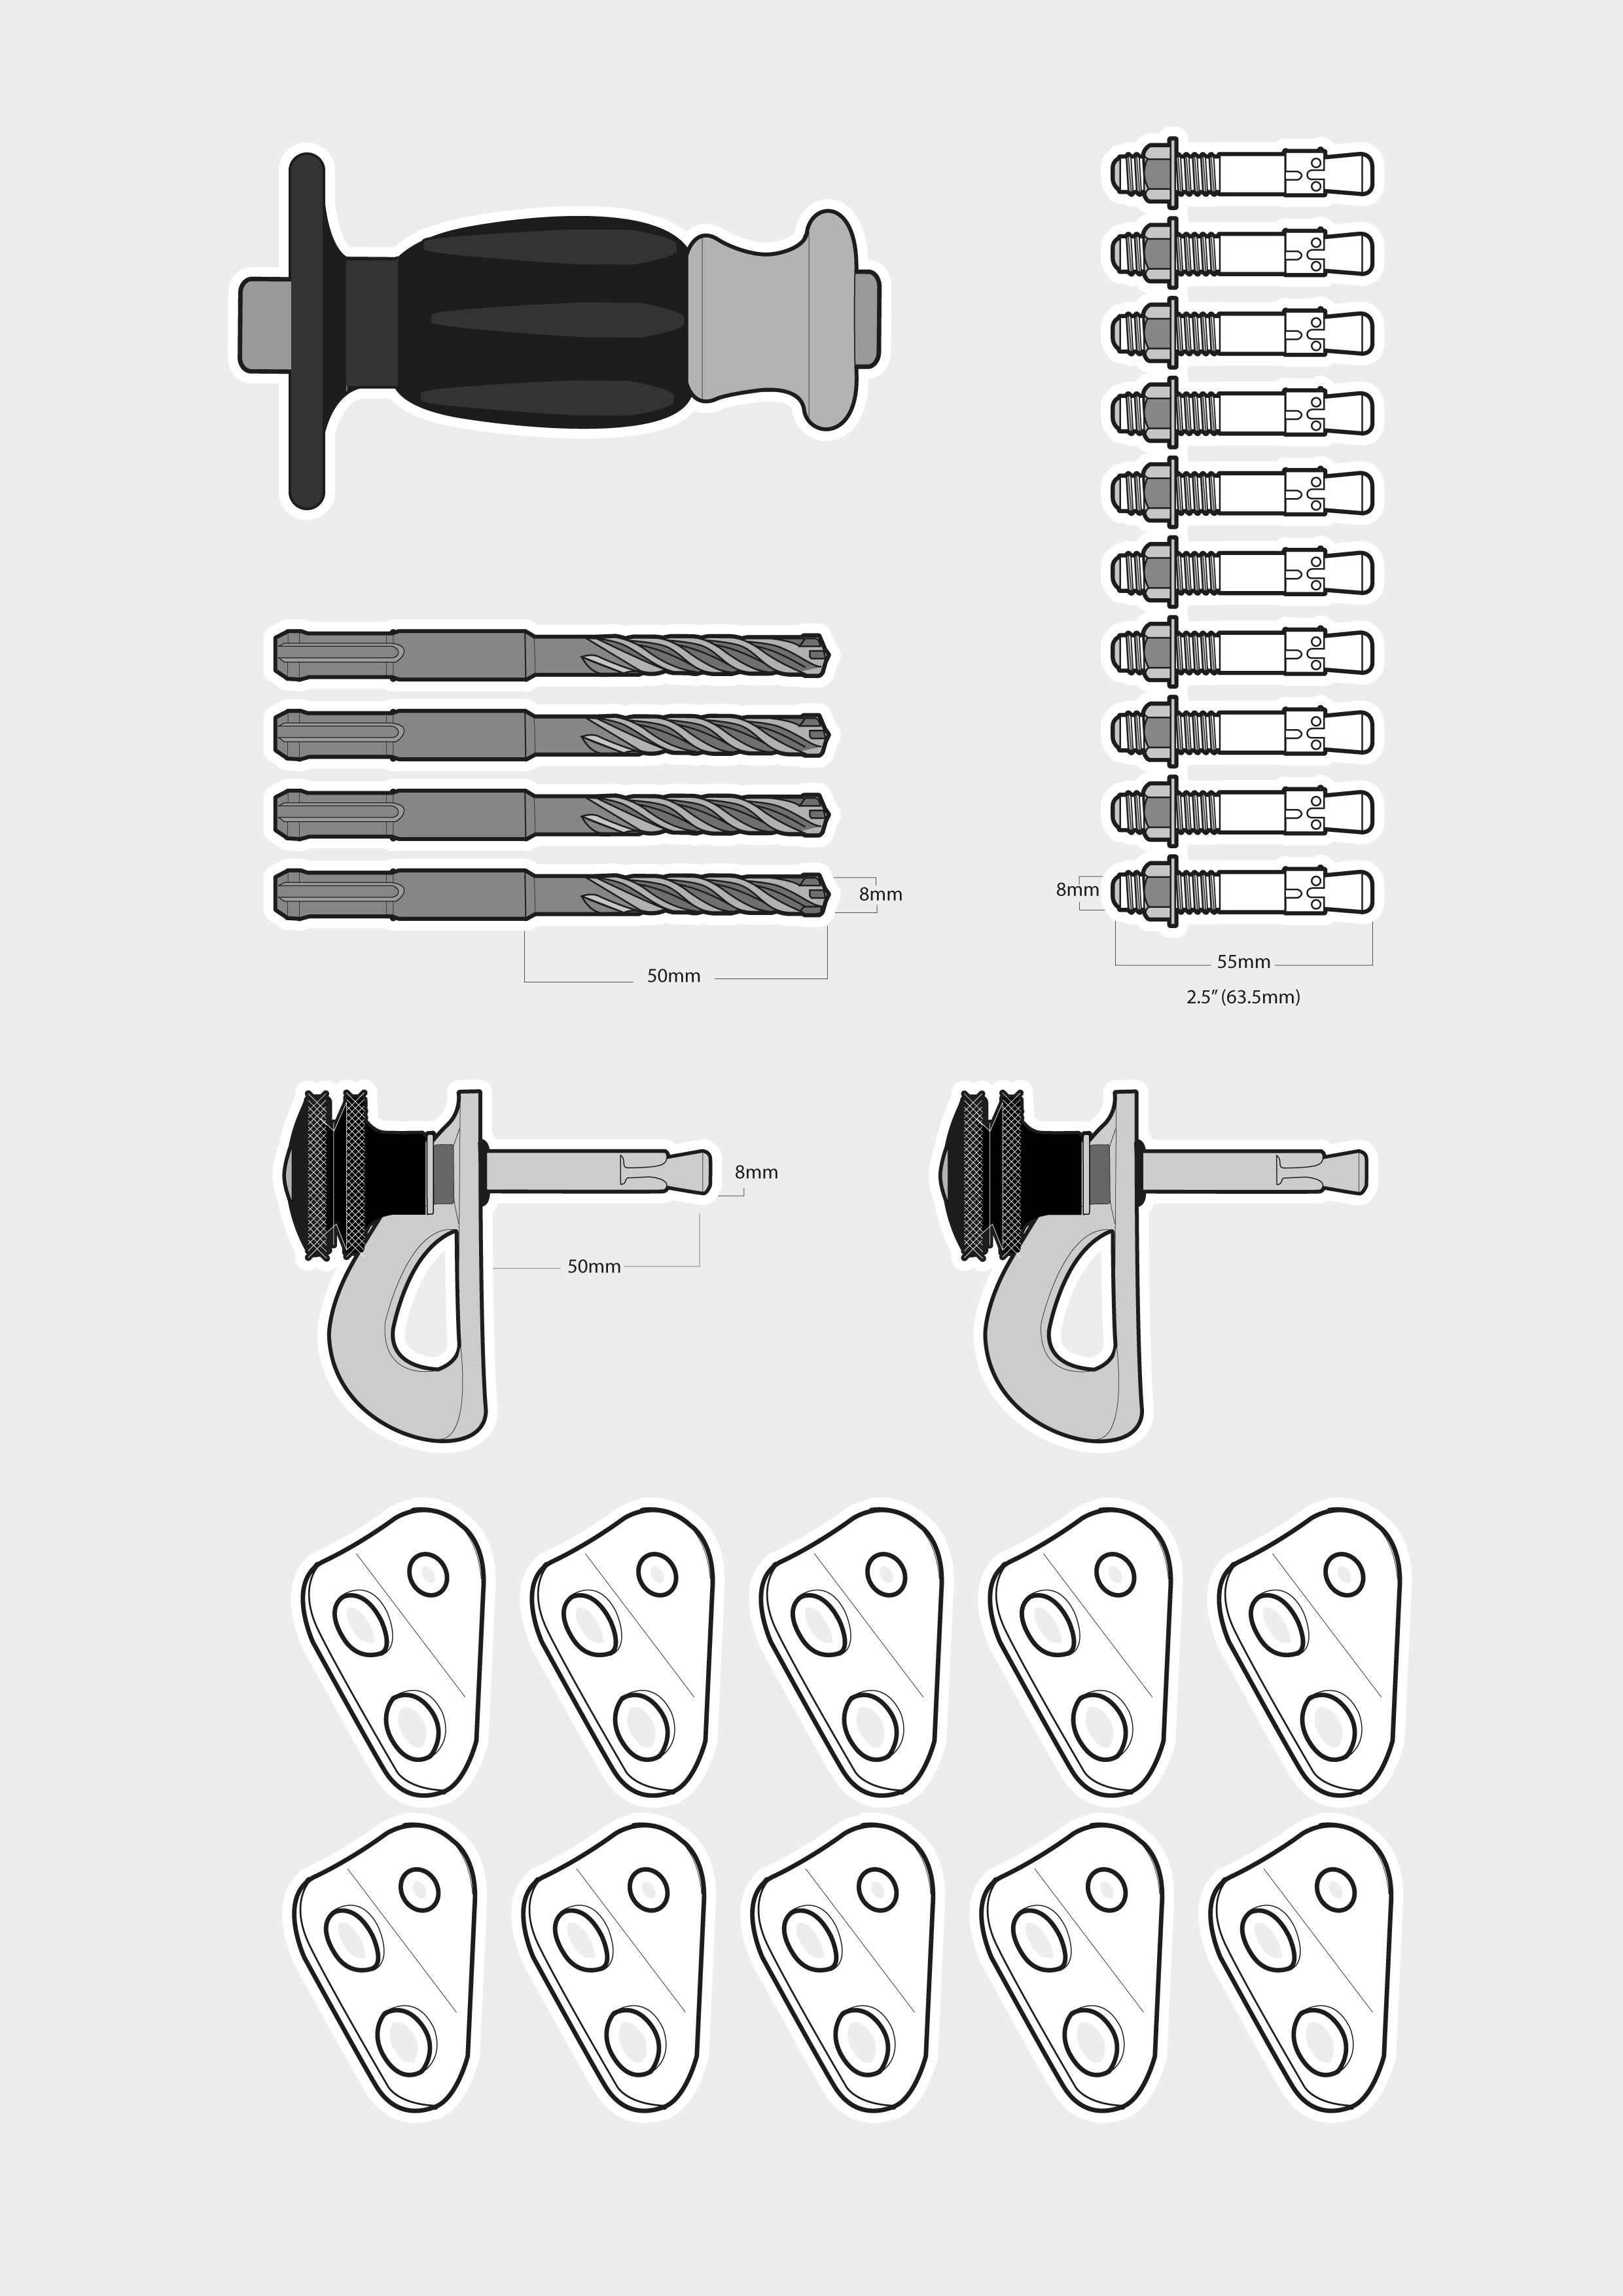
An emergency bolt kit us carried by climbers on walls where they may find rivets or lead/belay bolts have been damaged or are missing. This kit is usually carried deep in the haul bag and stays there unless all other options are exhausted.
The size of the kit varies but a good kit would include:
1x Heavy duty bag with clip in loop
1x Driver (Petzl Rocpec)
2x 10 mm SDS bits (50 mm)
2x 8 mm SDS bits (50 mm)
2x 10 mm short SS bolts + hangers
5x 8 mm short SS bolts + hangers
1x Blow tube
This is the bare bones of a bolt kit, with the 10 mm bolts used for belays and the 8 mm bolts used to replace rivets (the fact a rivet is missing probably means someone fell and ripped it out, so maybe a full-strength 8 mm bolt is advisable), or add rivets to span a feature that may have fallen off (5 rivets plus two main bolts and the odd drilled edge should span most blank features on existing routes).
An even lighter kit can be put together using a long SDS bit without a driver, the handle formed by wrapping thick finger tape around the shaft of the drill bit (attach a 3 mm clip loop via prusik knot around the bit, then taped over). This kit is small enough to fit in a small pouch in the main haul bag pocket and would comprise of:
1x 8 mm SDS bit (150 mm)
5x 8 mm SS bolts + hangers.
1x Blow tube
If using an SDS without a driver you must be careful not to drive it too hard with your hammer and clean the hole regularly, turning the bit after each strike.
Bolt Removal
The more obscure the route the higher the chance of coming across some junk bolts, and so it’s important to know how to remove and replace them. It’s beyond the scope of this book to talk about full-on bolt removal practices, but practical bolt removal. The simplest specialist tool, say on a wall you know you will be replacing bolts on (i.e., you have bolts to replace old bolts) is a tuning fork.

This is a long thin lost arrow with a 12 mm notch ground through its centre. By placing the tip between the hanger and the rock and hammering on it you can get the bolt to pop out of the rock. If you don’t have a tuning fork then a long thin lost arrow without the slot will also work, but you may have to wiggle it out several times and tap from different sides (make sure you have the lost arrow clipped off to something as it can easily spring free when being hammered on).
Some bolts such as Cassin bolts can often be pulled straight out of the rock with a funkness device or tapped out with a hammer. Petzl self drives and spit bolts have very low pull out strength but can suffer from their soft alloy hangers deforming, so having an 8 mm self-drive bolt fitted to a small steel hanger makes this easier.
To repair holes in the rock (if you leave a hole someone may well fill it with some other junk), then use epoxy putty, ideally sealing the hole with rock dust to make a neat job of it.