
Rope Belay Wrangling
How to tame your unruly ropes.

A tidy belay is a happy belay, but no matter what kind of belay you’re at; bolted or trad, big wall, ice or rock, the thing that makes the biggest mess are your ropes.
Messy ropes, ropes that become tangled in each other, or get hung up on features around the belay, such as bushes and spikes, can be either a mild annoyance or a major hazard.
Minor rope tangles as you pay out rope are a distraction, forcing you to deal with a never endings series of little problems, rope loops looping around other rope loops. Such small problems are easy to solve, but in aggregate, add stress and distraction from the business of belaying. Sometimes a lot of small snags with build-up, resulting in the dreaded call, asking if the leader can “hang on a minute”. But being told to ‘hang on’, in the middle of high smear on some nothing crystals, is neither conducive to feeling safe, or well looked after. It also slows everything down, which in the Alpine can result in more serious long term consequences, such as benightment. Even with such minor problems, the end result can be a belayer who is not 100% focused on the leader, but instead, they’re focused on fire-fighting problems.
In the case of more extreme dangers, a very messy belay can create problems that will stop the team dead, such as getting a rope loop totally stuck far below the belay, perhaps even having it blow up sideways and hang up above the climbers (if you can’t reach it, you’ll have to cut it).
On loose ground, such loops can also lead to rocks being dislodged, which could injure either your rope or other climbers. On some very dangerous routes, a leader can be fighting for their lives up at the sharp end, where being asked if they can “just hang there a minute while I sort out the ropes?” isn’t an option.
A messy belay can also result in confusion over what is safe to clip into and what is not, especially if the ropes have been integrated into the belay. An example of this would be clipping into what is assumed to be a master-point or strong point, only to find it’s just a loose loop of rope. Keeping your ropes off to the side of the master-point is ideal, as well as having it separated from the belayer in case they have to move location (this is not easy if all the ropes are looped over your in some way).
Most of all, a messy belay is a sign that you’re shit at your job, that you are lazy, or don’t really care about getting better, to master the skills of being a better climber.
Rope/belay organisation mastery
I’m going to employ my parachute analogy here, in that how good a parachutist would you be if when your parachute opened the whole thing was a tangled mess, perhaps such a mess you’d be falling through the air at terminal velocity sorting out the tangles. The answer is you’d be the worst kind of parachutist; you’d be dead.
Another analogy, and one that is important to understand in the context of climbing in stormy weather, winter climbing etc, imagine you’re sailing a yacht across the ocean, and your ropes are a mess; tangled, trailing in the sea, knotted. Sure you can sort of make it work, as long as you spend ten times the time and effort, but what about when the storm comes up? What if you no longer have the luxury of time or even nice warm fingers to play against the problem? Remember that errors can often accrue dept over a long period, a dept that will be due when you can least pay it.
No, if you want to be good at this issue, you have to master it.
Things to consider
Here are a few notes and points that are important to both understand and factor into your system.
- First Rule of rope organisation
The first rule when dealing with tangled ropes is to avoid tangling your ropes. This means you have studied the problem, understood the causes, and have taken action to avoid it happening. If they happen anyway, these should be rare occurrences, and your studies will mean you’ll spot them early and know what to do. If they happen all the time this means you’re probably a bad student.
- Rope organisation time investment
Just as with setting up your ropes to rappel, any time invested upfront will be repaid ten times over later on. If you’re lazy and cut corners when securing the ropes when you belay your seconds, every minute you think you’re saving by being sloppy, will be added tenfold onto the next pitch when the ropes tangle up. Develop a process and use it.
- Rotation
One of the biggest considerations of rope organisation is the style of climbing you’re doing; if you’re swapping leads or leading in blocks, or if one person is leading the entire climb. With some organisation methods, you need to know what system you’re using, whose turn it is for example when setting up each belay. With more modern techniques (see below), you can easily adapt the rope set up depending on the mood of the team once everyone is at the belay (sometimes people don’t want to lead through).
- Hands-Free
The use of a guide style hands-free belay device is game-changing in terms of being able to manage your ropes as you gain slack while belaying, as well as adding an extra degree of safety if you have to let go of the ropes. An experienced team will know if the ropes slow or cease to be taken in, this means the leader/belayer above, must be taking up the slack dead rope to form a loop and should slow their pace.
- Reset Rewind
How the ropes are once everyone gets to the belay does not have to be how the ropes are when the leader leaves the belay. As with the time investment above, just saying “let’s sort the ropes out”, and just getting them perfect for the next pitch will pay dividends once you leave the belay. This is especially true if you’re climbing with a novice, or someone you guess is a little slack when it comes to rope management, as the leader is able to influence what’ll go down (or up) at the belay once they leave. Even when standing on a ledge, quickly making a new pile of rope with the leaders end coming off the tope will always pay dividends. Think of it like repacking your parachute, and try and avoid “it’ll be OK” mentally.
- Bad form
There are many old school demonstrations of bad form, some that have led to fistfights on belay ledges, but standing on a rope is perhaps the worst, especially of wearing crampons. The reasons for this are obvious, but I’d also view them as a reminder that standing on your ropes as a sign of laziness. A second thing that’s worth viewing as bad form is having your rope loops hanging down over the climb itself, meaning the second is forced to not only negotiate the moves, but also the ropes. Not good.
Classic Rope Wrangling Methods
The are several well-known methods of organising the ropes on the belay – or not – classic methods that have their pros and cons. Here is a run down and critique of a few of them.
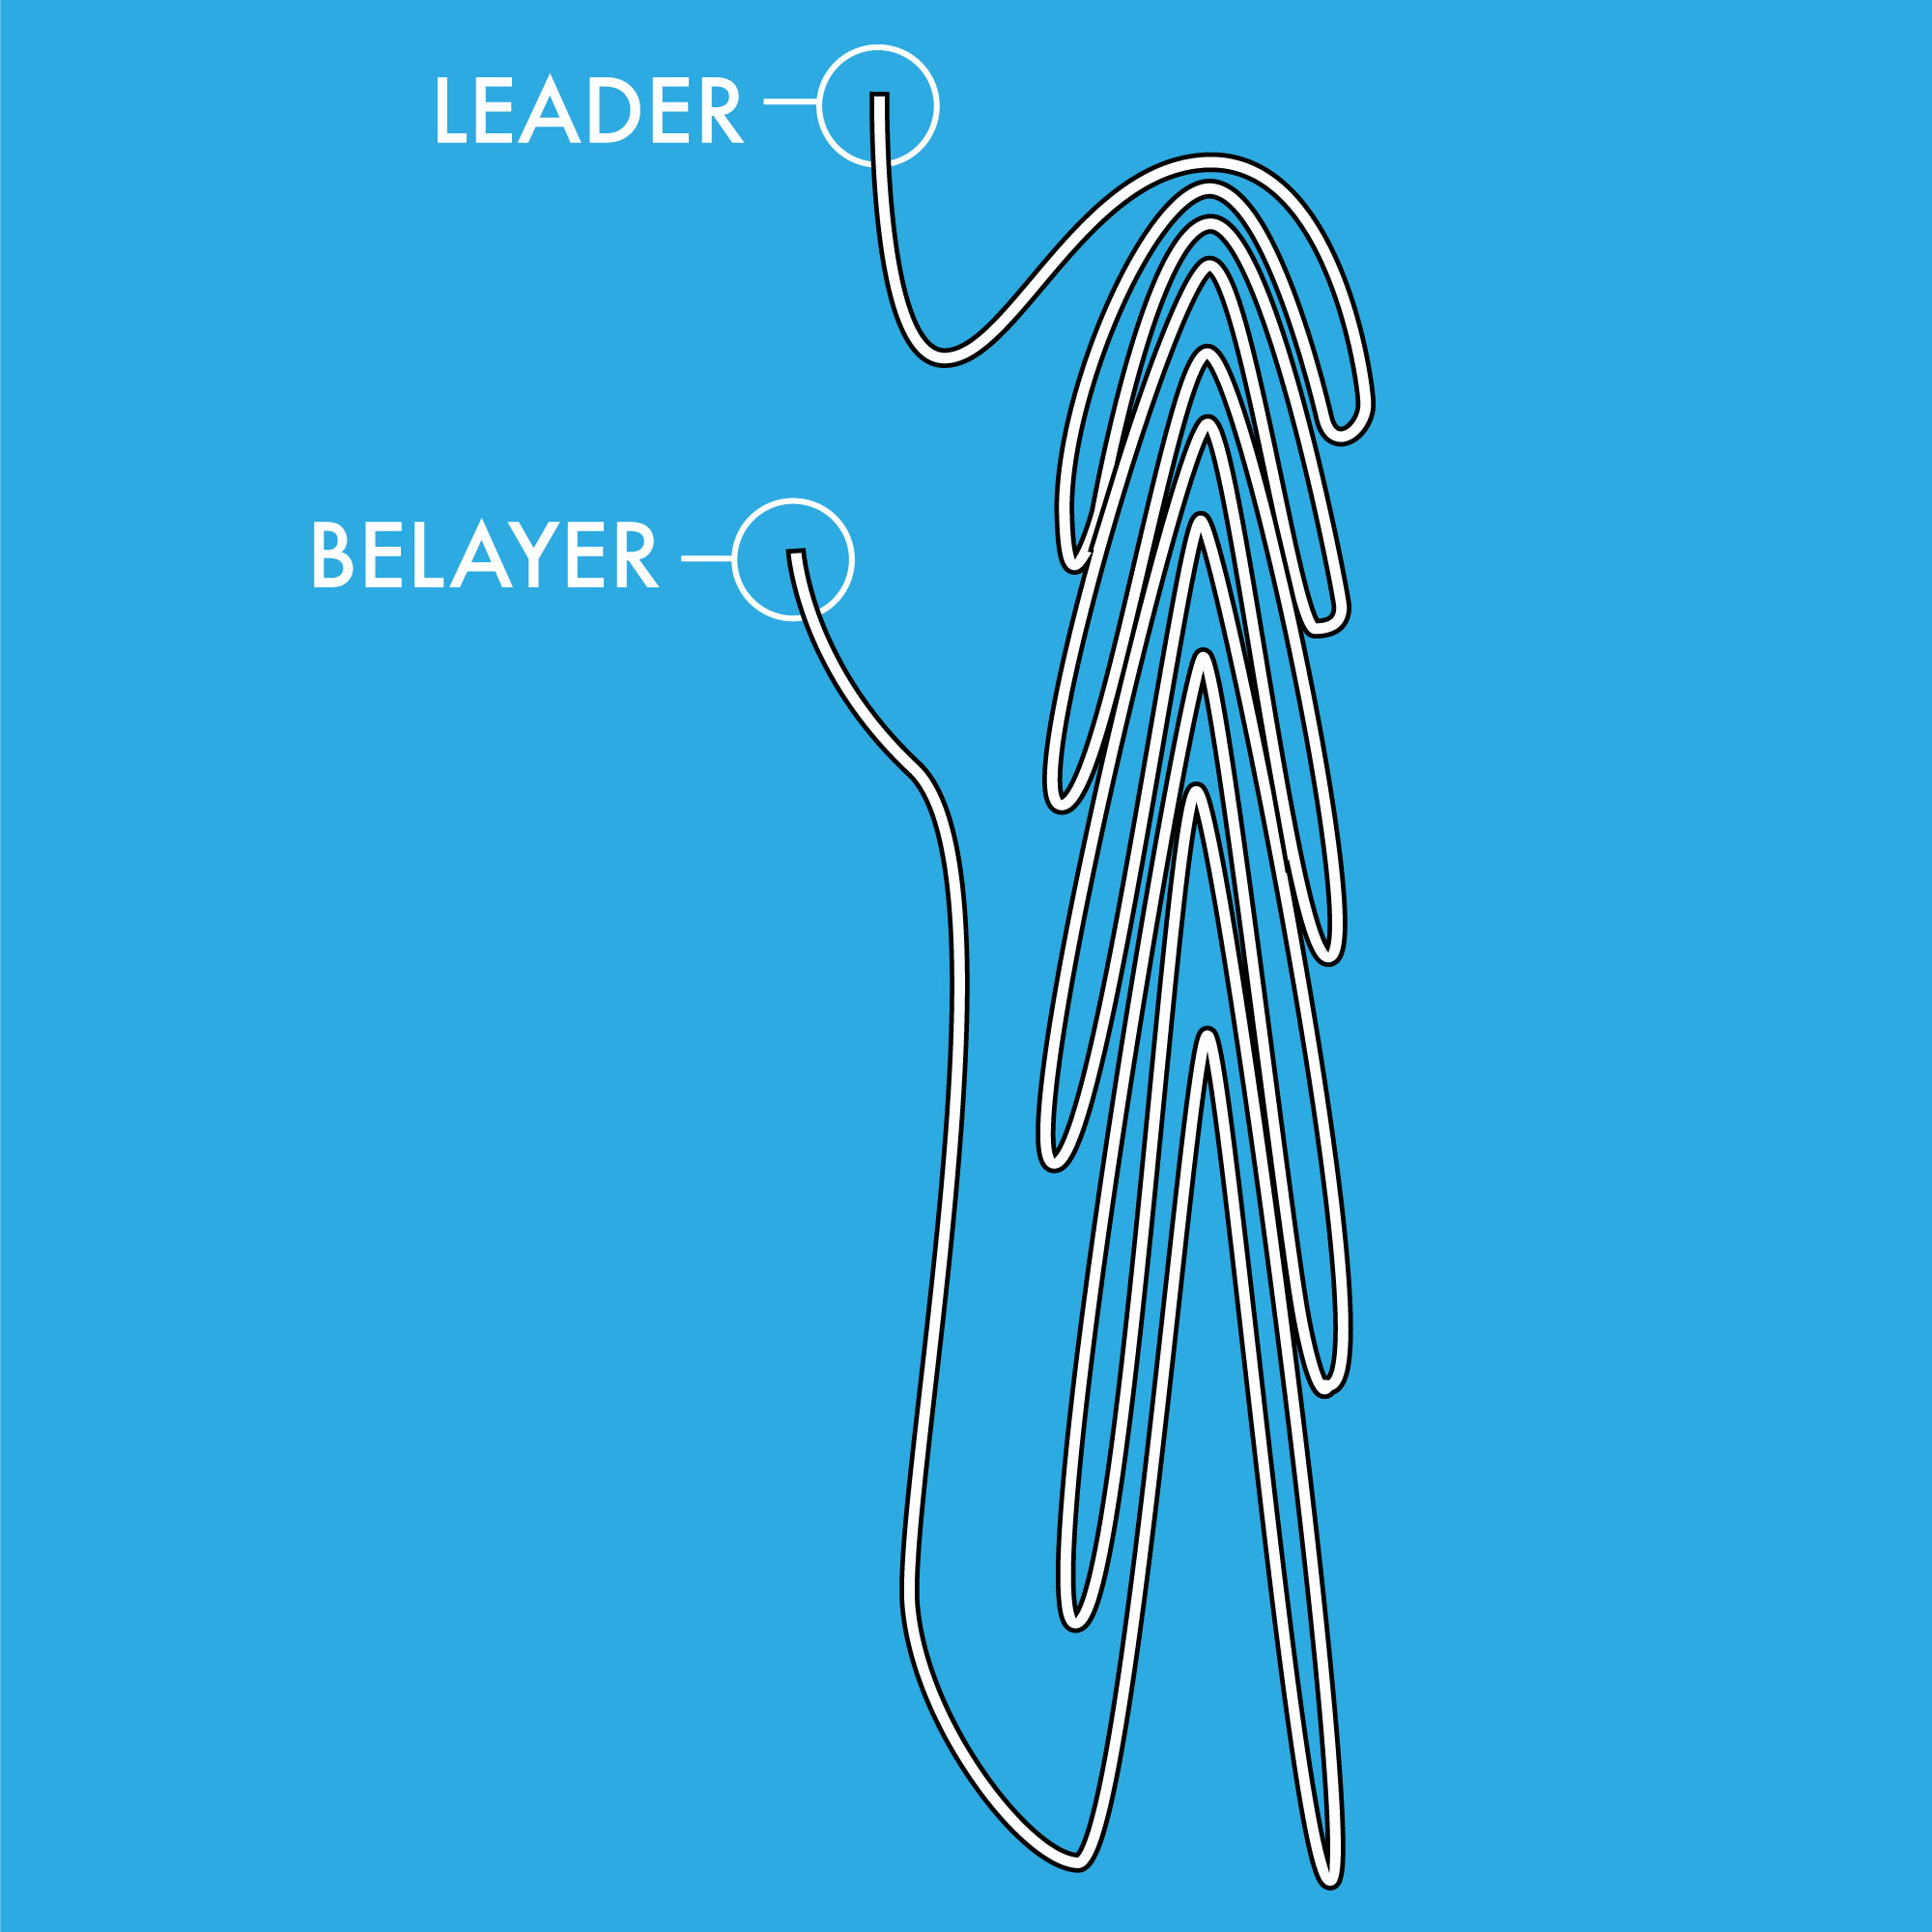
Hangman: With this method, you don’t organise the ropes at all, and on a steep climb you just let the entire length of ropes hang down, which for most climbers will be a 30-metre loop of rope. I’m sure I don’t have to point out that this is not a good idea, even on overhanging terrain in still weather.
Rope Carpet: This is an alternative to the above but used on ledges, the belayers simply dumping the rope on the floor. On a pristine ledge this may be fine, ignoring that climbing ledges can often be also covered in piss and dirt, but on many other ledges, ledges with tree roots, rocks and stones, it’s just asking for trouble. Ropes will snag or dislodge rocks and general ledge detritus that might hurt other climbers, or even your second if you’re forced to lower them.
Ralston method: I’ve sometimes seen climbers belayed next to cracks who just stuff the rope inside, letting it feed down over chockstones, and generally dangle into the centre of the earth. This of course is stupid and lazy, with chockstones well known as mother earth teeth, always looking for ropes to nibble and chew. Get your rope stuck beyond arms length inside a crack and it’s gone forever. Treat all cracks as if they’re smeared in radioactive dog shit.
Lap Loop method: This method loops the ropes over the strand of rope that goes from your tie-in to the belay, or over a leg. Each loop is generally as large as possible without the risk of tangles, meaning they can be down to your toes (so one-metre loops), or several meters. A good rule of thumb on loops length is to not make them any longer than you can reach, but this must be balanced by the fact that the shorter the loop, the greater the loops, the greater the chance of tangles. This classic method works OK, but not perfectly, as long as you’re swapping leads, and have a single rope, and make sure all your loops are the same length. Add in two ropes, a bit of wind, and block leading, and things tend not to be as good as you hoped. Not terrible, but not always perfect. Never the less, this is the default method. If climbing in blocks the ropes are generally flipped over to the second climber when they arrive, so the bottom loop is now at the top - hopefully. In practice, they tend to be all over the place. In very high winds this method tends to be no less messy than any other, as loops will find themselves tangling into one another, resulting in snags and tangles when you least want them. One major failing of this method is the belayer becomes draped in ropes, which makes moving around more difficult, say if they are several metres from the anchor, and must move back there to do something. This is one reason why I think a remote system separate from the climber is better.
Sling method: Here the ropes are looped through a sling clipped to the belay. It’s best to always loop through an open sling, rather than larks foot around a bunch of coils, as rope loops need some pass the ‘pop’ as they are released (you will feel a little resistance as the loop leaves the stack, but will just ‘pop’ free at the end. Although it’s a little more work-intensive I also like to keep rope loops about a metre long, and carefully adjusted to make sure they’re neat and tidy. This method is also ideal if you know you have to move the belay to a different stance, as the whole stack can be lifted and carried easily.
Offset Lap Loop method: This method can be applied for either of the above, working in the same way, but where each loop is made a little shorter than the loop before it, so no loop can be captured as they rope feeds out. This if course only works well when swapping leads.
Separating loops method: Sometimes you’ll see climbers separating out a double rope, with one rope on each strand of a cordelette for example. This works quite well, but I feel there are easier methods that you could employ.
Modern Techniques
The following techniques are more up to date methods that are well worth practising.
Rope Bucket
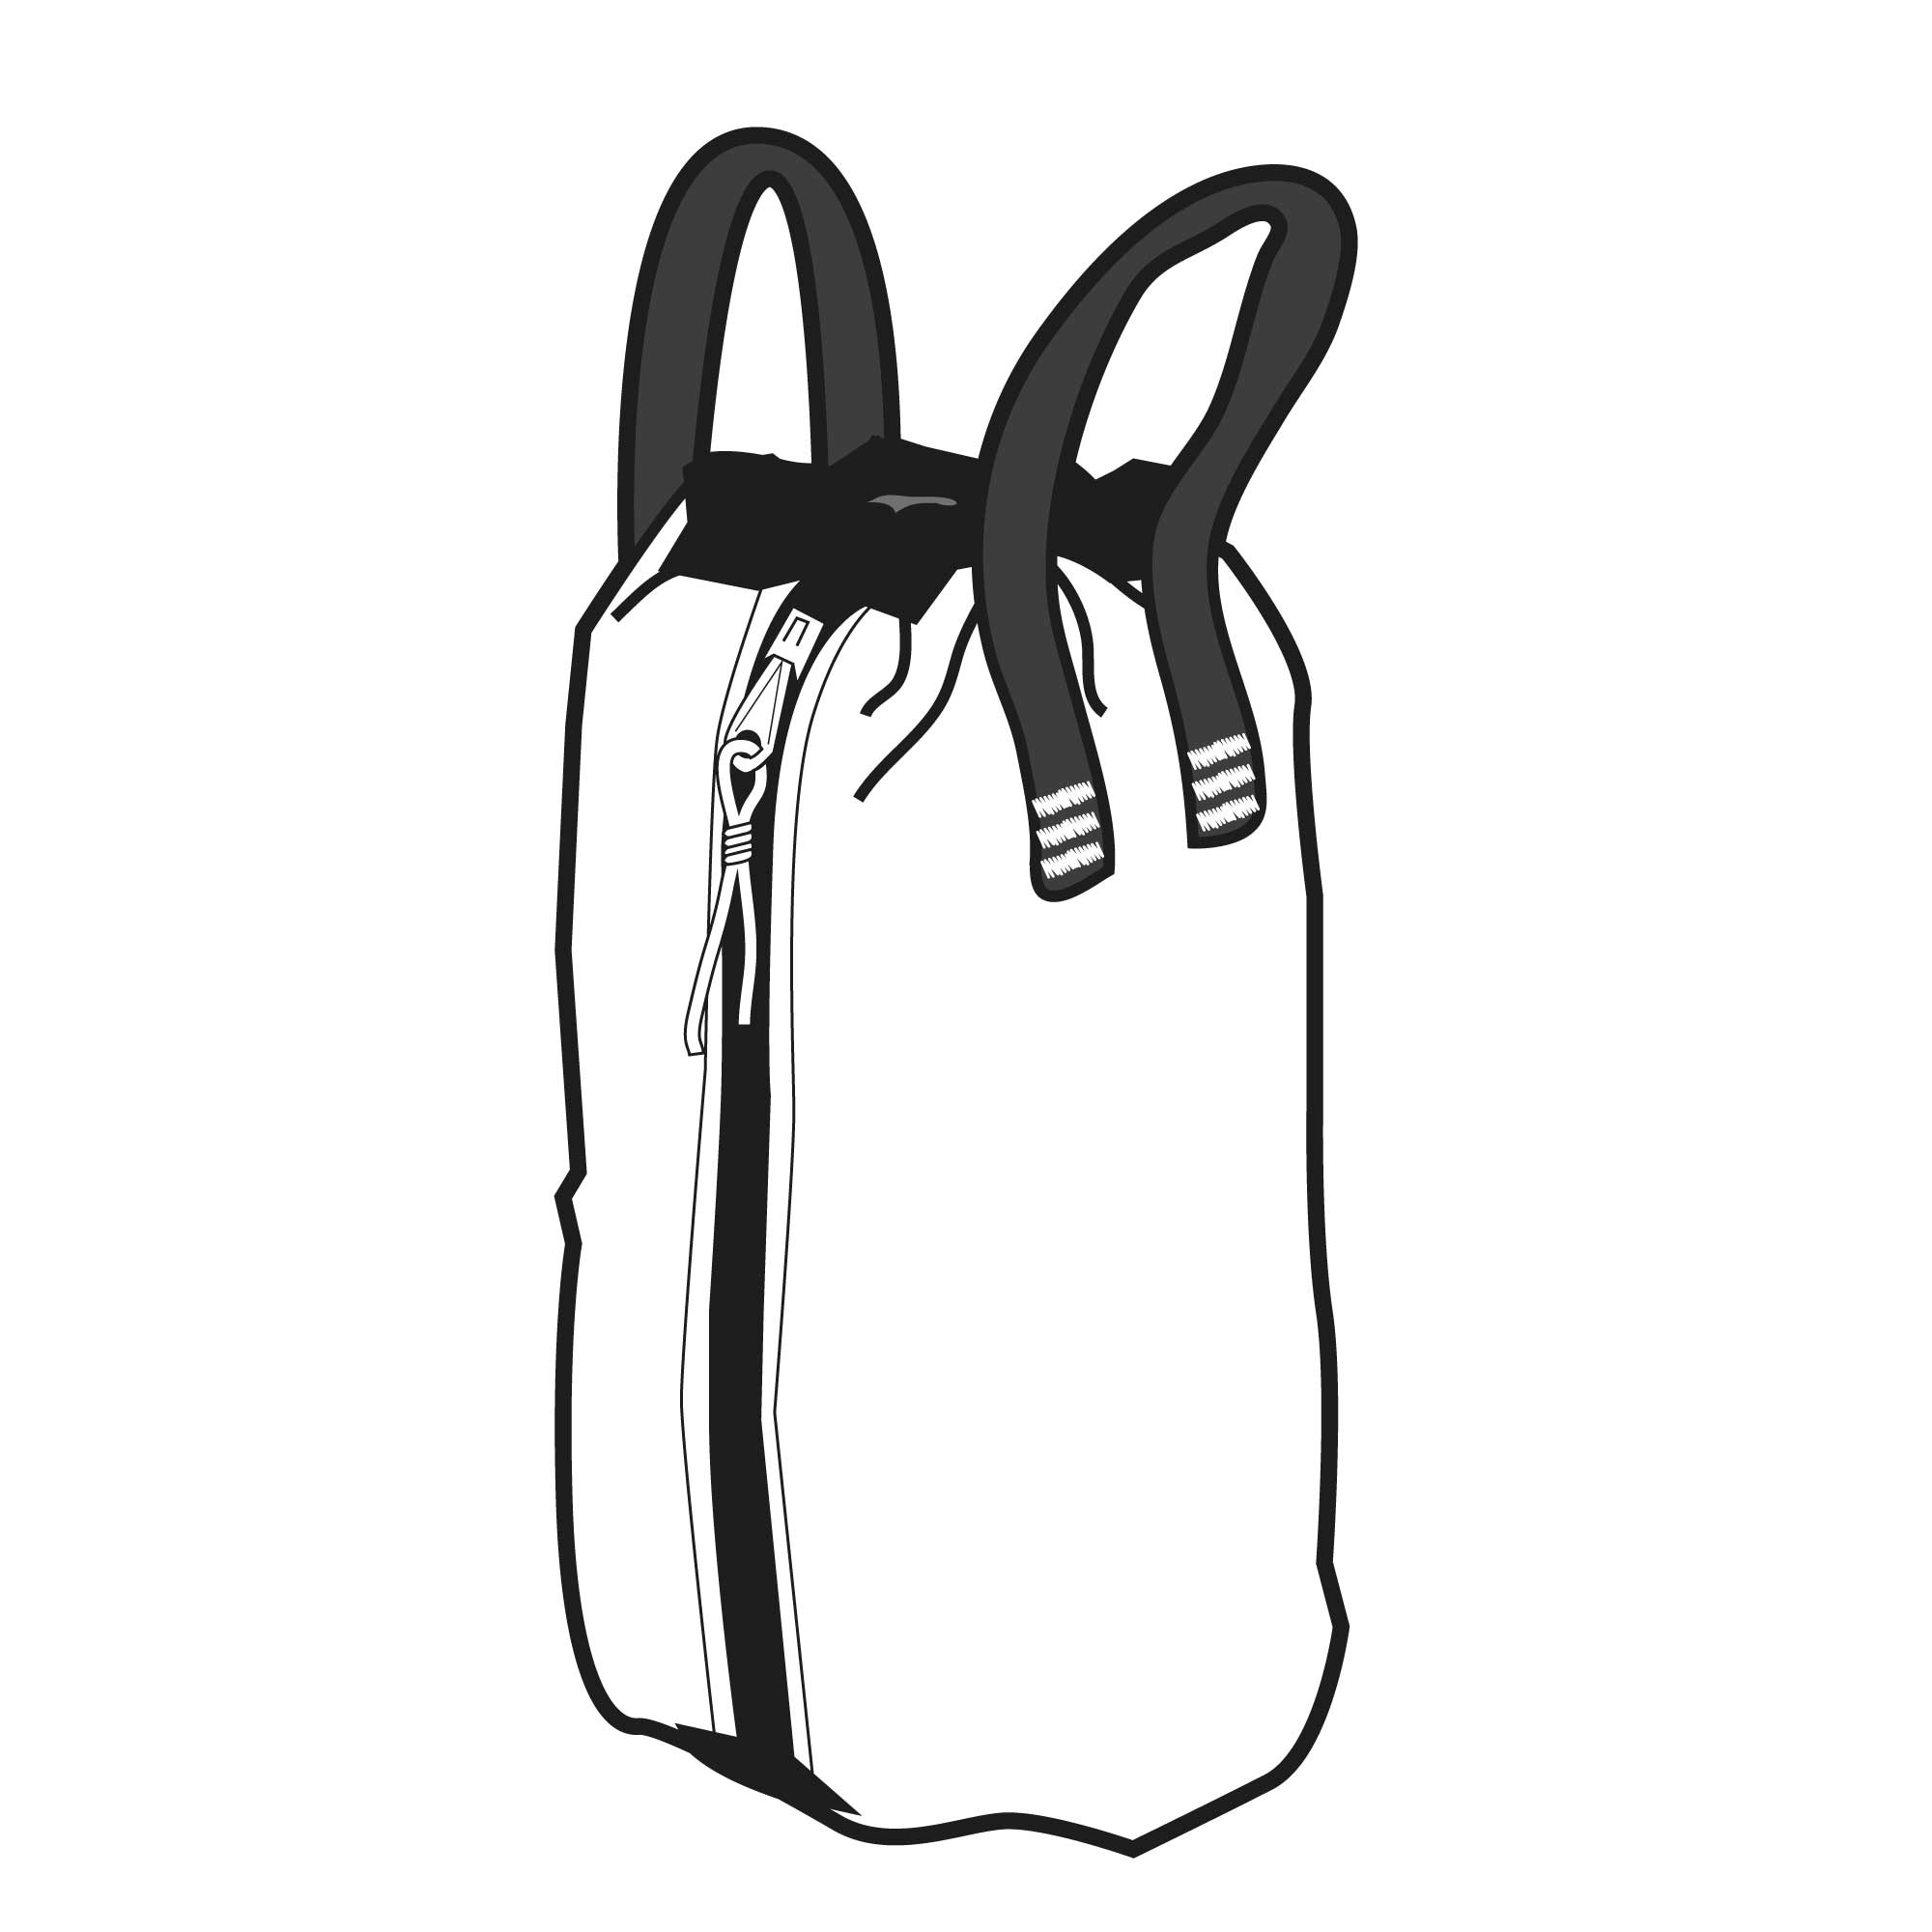
Of all methods of rope wrangling, the rope bucket is by far the best, as it creates that perfect parachute-style package, reducing the chance of a hang-up pretty much to zero. The rope bag is also a smallish package and so can be more easily controlled and monitored, and is ideal for bad weather or where you have a very complex belay set up. Although rope buckets are primarily only used in big wall climbing, rescue, SRT, IRATA etc, they probably do have their place in multi-pitch rock climbing. Standard buckets are generally too heavy duty and overbuild for trad climbing, but it is possible to build a rope bag from Cuben fabric (Dyneema composite), that weighs the same as a bag of crisps (an empty packet) and will stow away to nothing a mini climbing pack. Using a rope bucket like this is a great idea when climbing with less experienced climbers, or by climbers who just cannot ever escape from rope tangles.

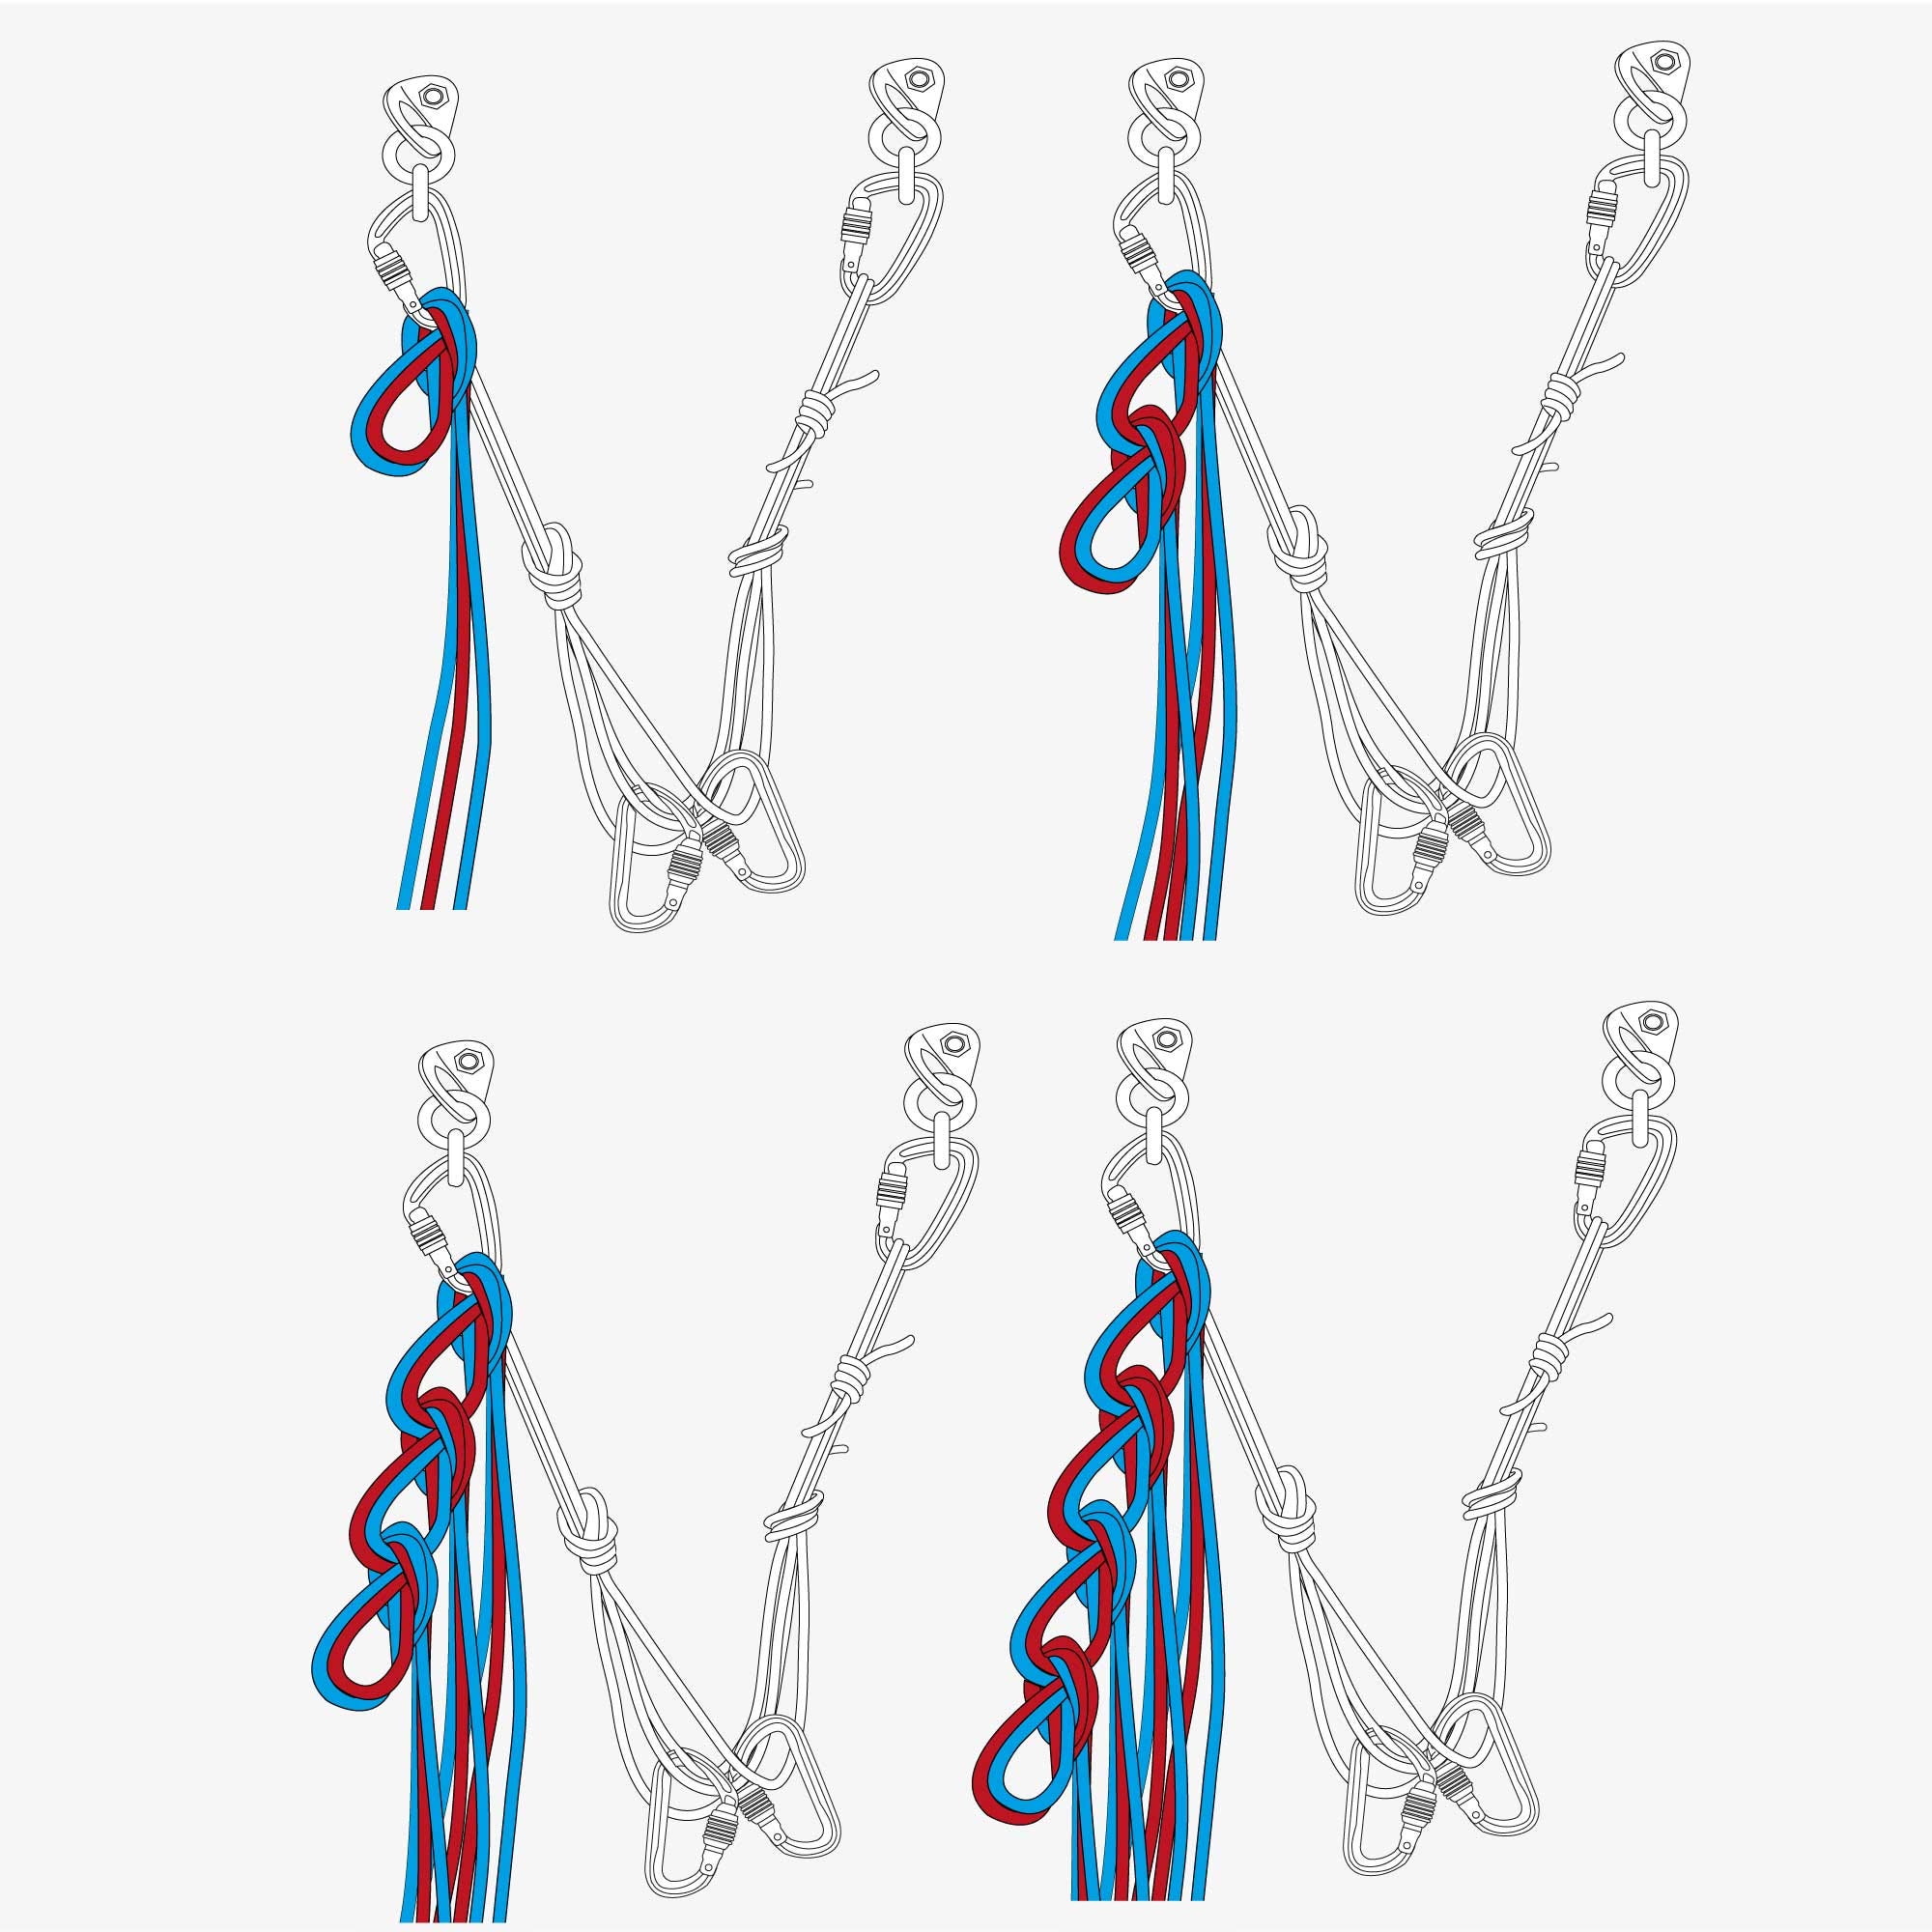
Knot/karabiner method
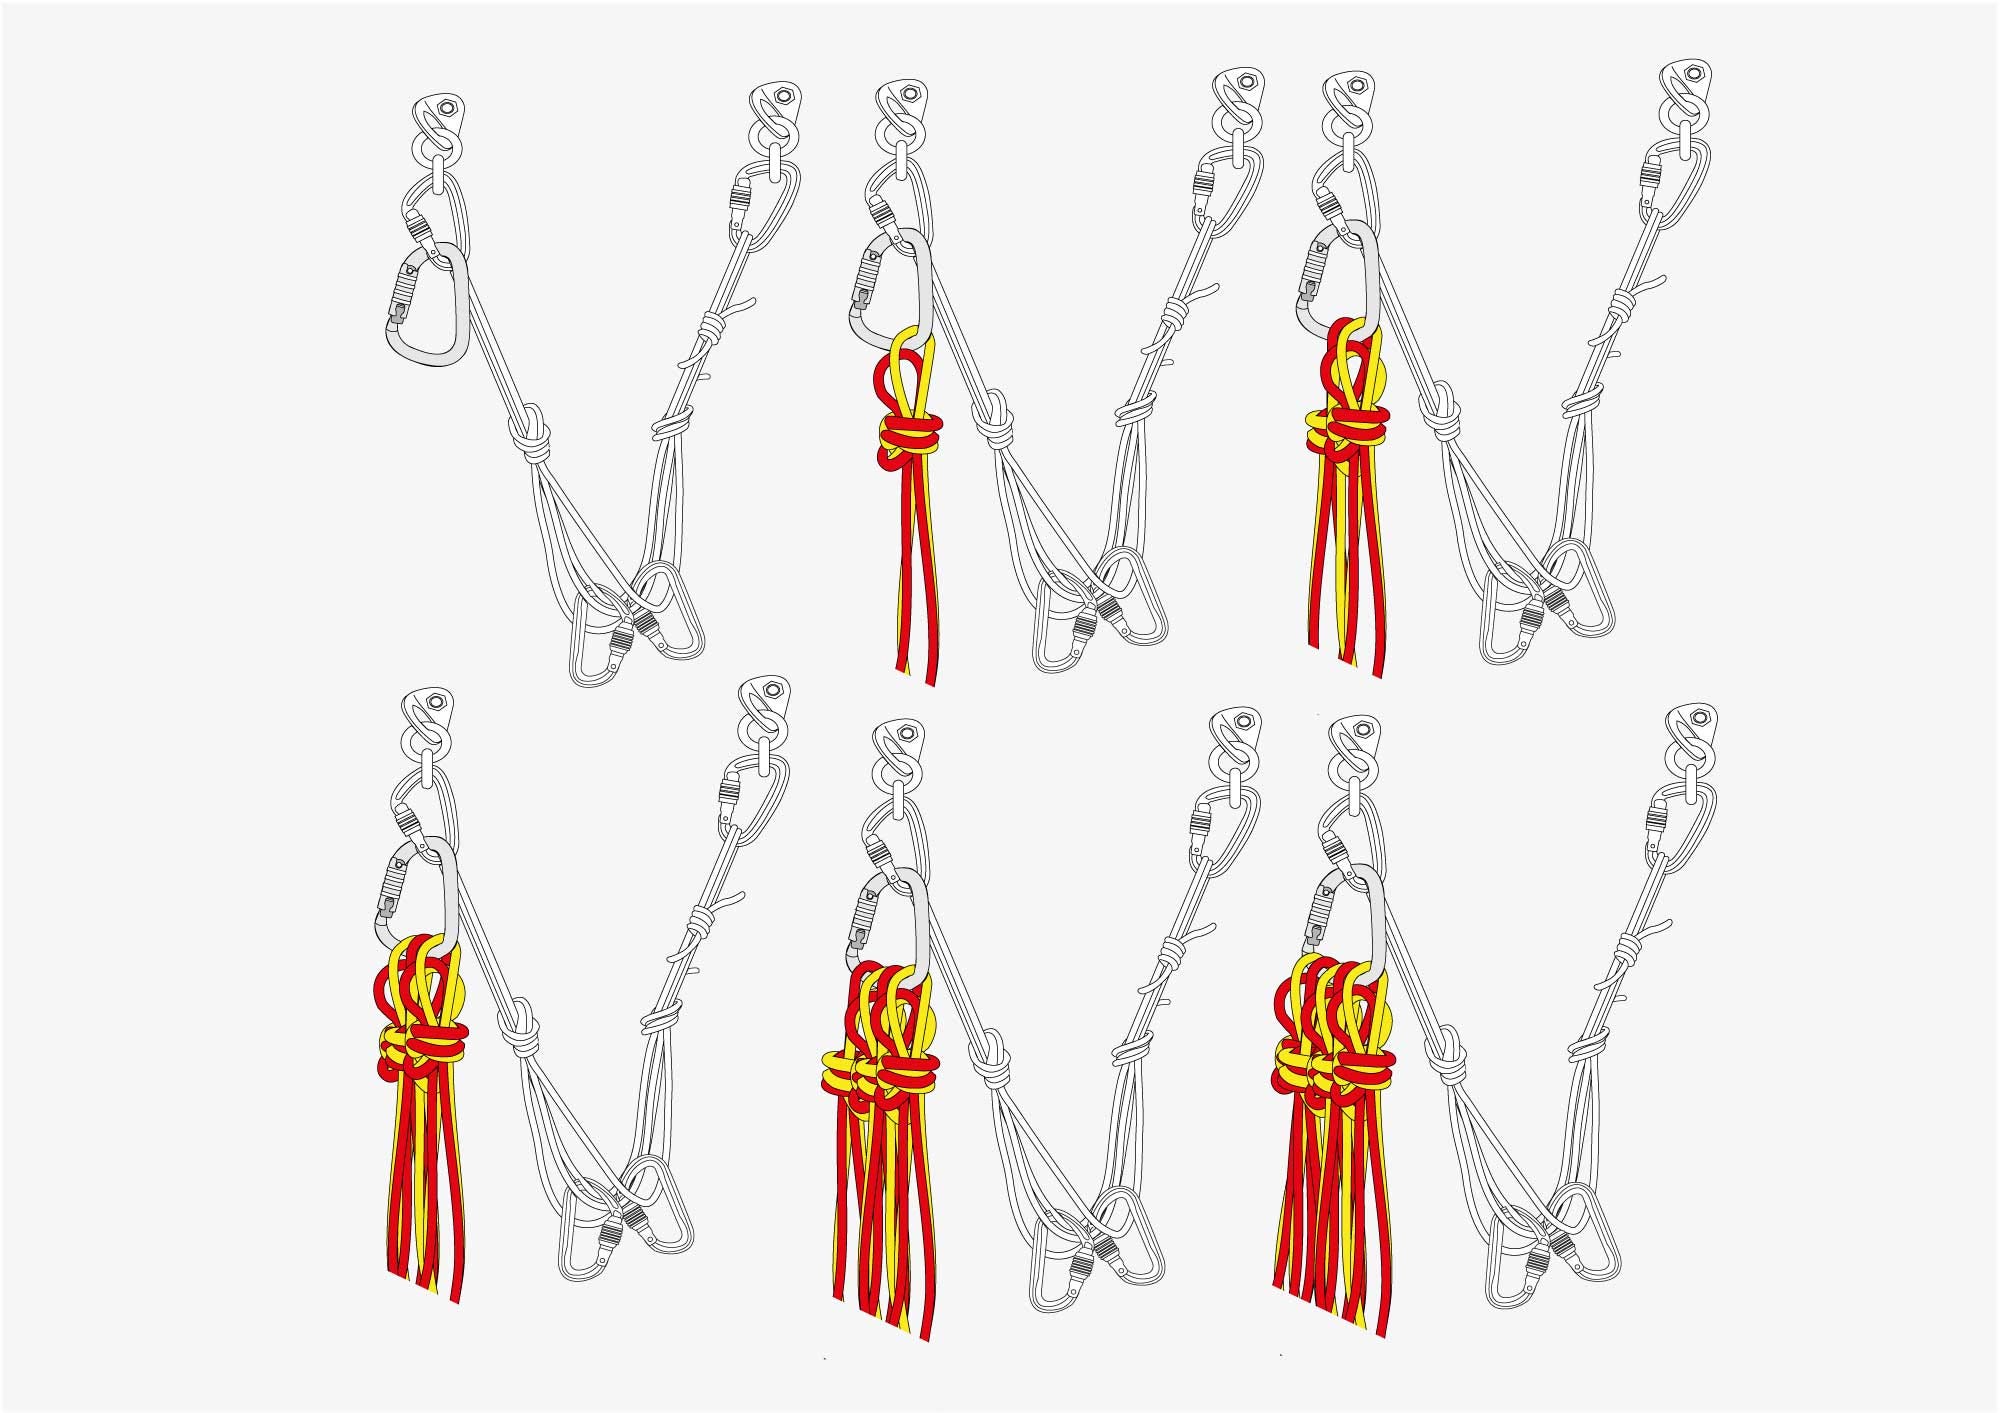
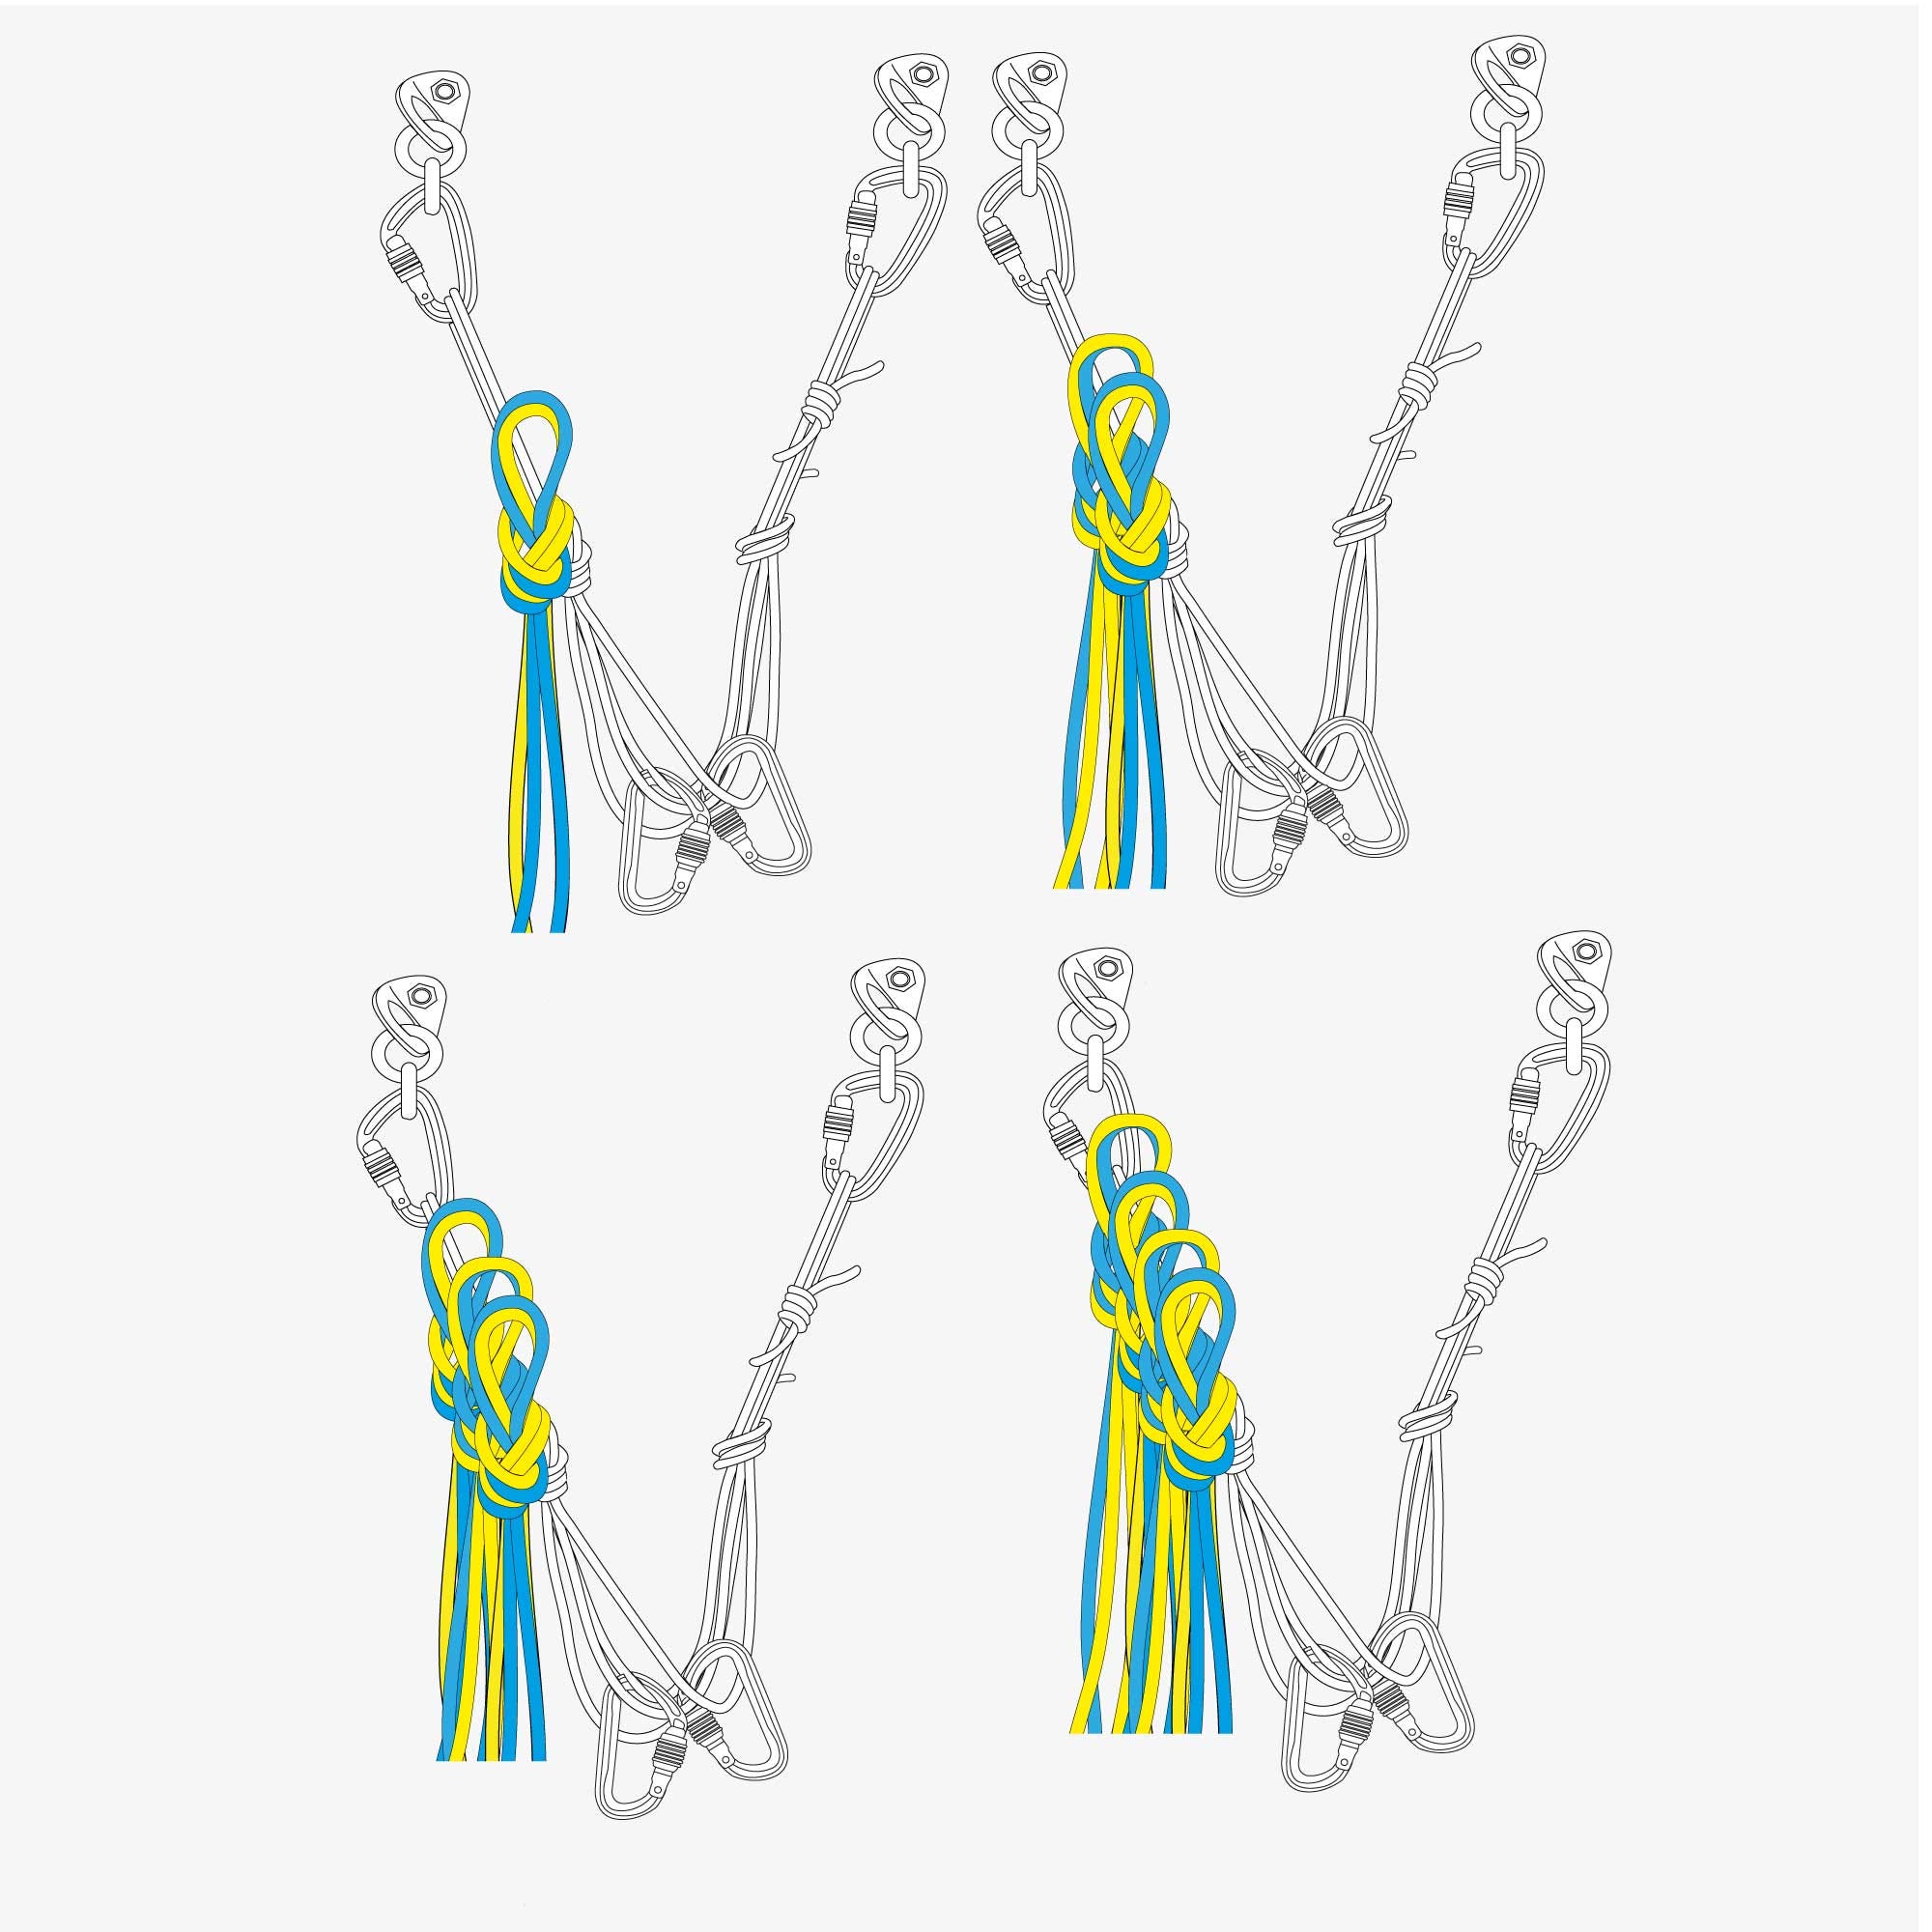
I’d call this method the new classic method, and works around clipping off loops of rope to a large locker, or oval karabiner, every ten metres or so, so you end up with six five-metre long loops hanging off the karabiner (or twelve if you have two ropes). The ropes can either be tied off with an overhand knot (tie off both strands together) or individually with slip knots, so the knots come apart once unclipped. Note, when tying off with overhand knots, you should only clip one bite of the two-bite knot into the karabiner, so as to create more space. If you’re swinging leads then as the leader climbs, the belayer simply unclips each knot before the rope comes tight. If you’re climbing in blocks, the karabiner is flipped, so the initial knot, which is at the back of the stack, is now the first at the gate (and not the last). If you want to make your loops shorter, then you might struggle with getting more knots into the karabiner, but you can just add a second karabiner, as use one of the methods below.
Knot fundamentalist method: This does away with the karabiner, and you simply tie the ropes off to the belay directly, either to one arm of a cordelette for example or into the belayer’s rope leading up to the anchor. To tie, simply tie an overhand knot, capturing the arm of the cordelette or sling as you do so. If climbing in blocks it’s important that each knot is in sequence, so the belayer can see where the first, second, third knot is etc.
Daisy chain method: This is the same as the above, but you only tie one loop into belay (directly into a bolt or rapid-link for example), and then tie each loop into the loop before it, so each loop stops the one above from coming undone, and each loop is inline. This method does not work if climbing in blocks, but keeps are your ropes out of the way of the belay.
Conclusion
So there you go, a few ideas on how to get yourself a tidy belay! Which one is best? Well, they all have their place and I’d recommend that you practice them all, as there is no one size fits all solution, so just pick one and try it for a while. And if you find you still get the odd tangle? Well, chaos and uncertainty are why we climb, not order and certainty, so just do what all climbers have always done when they come across a problem: just deal with it.
Last word
If you found this article informative it’s worth noting that it did not come free of charge, but was subsidised by paid subscribers to this Substack. If you’d like to see more content like this then please become a paid subscriber, or just share this content so that others might lend a hand.
Thanks Andy. Definitely going to use the knot/karabiner method!
Subbed. Great stuff. Just did my first wall and was frustrated with the sling method. Any further recommendations on how to organize a third cord e.g. long 50m tag line?