

In 2014 I wrote a piece for UKC, a 5000 word monster, on how to climb the Nose on El cap. The piece, which has been read over 65,000 times, was based on two ascents of the Nose (as well as twenty or so other walls). Since then I’ve climbed the Nose a further three times, including a stormy winter ascent, so I thought it might be worth revisiting the article.
As with all such things I write, I will get a ton of people telling me I’m wrong (the kind of people who generally never take the time share the right way to do anything), which can be a rich source of information (so it’s worth checking out where this appears on my Facebook page). Just remember thought that I’m just writing about my experiences, and so are they, so always treat all advice as guidance not holey lore.
Lastly, as in the original piece, this article is designed to give you a lot of info to digest, allowing mortals to have a fair chance at the Nose; by mortals I mean not full time climbers, but people with limited holidays and no time to try it twice. Although I cover some technical details, this is not a manual. For that there are several good books on technique, but by far the most complete is my book Higher Education (300,000 words!). Yes that’s a plug.
Basic Questions
How hard do I need to climb?
The harder you can free climb the easier the Nose will be (and the more aid you can avoid) but be warned that The Valley is a place that punishes anyone who comes with the idea they can ‘crush it’. This is still good advice, and I’ve met many really strong free climbers who have come a cropper due to overconfidence in their ability, resulting in them going home without an ‘easy’ tick.
First off, you need to be able to climb cracks, and I’m not talking about the ten metre gritstone kind, but smooth, sometimes polished cracks, cracks that feel as if they go on for miles, where you only have a few pieces that fit. Most normal climbers (not full time climbers) cannot just rock up and climb at their home grade, unless they come from, even if they climb on granite (I’ve met several Chamonix guides who found the transition tough). You have to take into account the heat, polished rock, the exposure, the pressure to perform, the wind, people climbing over you, telling you to get-the-fuck-on-with-it, all while only having had four hours sleep.
In such circumstances, a pitch can feel five grades harder than it says on the topo, which makes you feel like shit, and you’ll bail. Also, add in the reality that for many climbers, the body (not to mention feet), will be beat up from day after day of endless punishment, even before you go on the wall, and so you’ll be dog tired (deep inside) before you even commit (Yosemite and Camp 4 are not restful places).
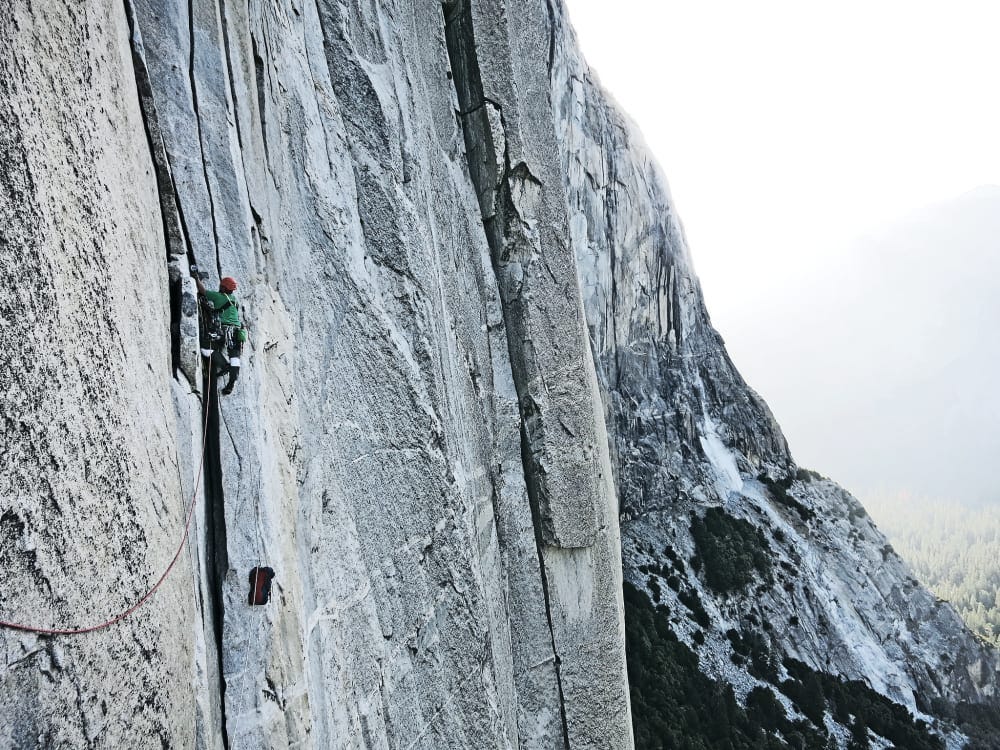
There is also a big psychological factor here, as I’ve met many strong climbers (cranking E7 and hard sport) who just crumble on the wall due to exposure, the Stove Leg cracks being a place people often come undone. Up there, the cracks look like they go on forever, feeling harder than people say (“the stove legs are easy 5.8”). Up there the wind smashes unto you, tangles the rope, and you can’t hear each other. The wall stretches on and on into the sky as you look down, ten metres, to your last cam. You slump onto a cam and try and aid instead, but you’ve never practised it (you’re a wad, why would you?), and so you takes bloody hours. Then you bail.
I have a friend who said he was going to free most of the Regular route on Half Dome, but from the very first hard move, he started aiding, and aided the lot.
To cruise routes at your normal grade, I think you need a month of just cragging out in the US, and if you had longer, you’d start by hitting the desert cracks to get your crack skills up. You need to feel comfortable, know how to tape up or use crack gloves effectively, run it out without freaking out. Yes you can do this by ticking off some classic lines in the valley (short and technical for confidence and skill, long for stamina and head), but you also have to keep an eye on the clock. If you spend two weeks getting up to speed, and can’t get on the Nose, you might run out of time (one of the main reasons for failure is people put off committing for too long).
To climb hard long walls as free as possible you need to be both toughened up by constant climbing, as well as just fit enough to keep going, and I find having strong toes and feet (ideally with deadened nerves!), is vital, as crack climbing at this grade is very much about your legs and feet and toes (you move up the cracks with your legs, not your arms; arms just holding you in place as the legs do the work), so general fitness (which you can work on at home) is of equal importance.
Granite can also freak people out, as often there seems to be no footholds, yet it’s marked as easy free climbing (this happens on the first few pitches), and so doing some Tuolumne slabs is great practice (having the right boots for cracks is also a huge factor, with mega tight boots for doing V12 boulders not what you want, the classic TC Pro the boot everyone wears for a reason).
If you get in shape, you should be able to French free (A0) all the way to the Great Roof, with the odd section (A1) using an aider, as there are long sections of moderate rock climbing, interspersed with some pulling on gear, or aiding a few moves. Again, you can practice French free at home, even at the climbing wall (going from aid to free and back).
Above the Great Roof things get a bit harder and steeper, and even pitches that would be easy if they were on the ground (like the Pancake flake), can feel very intimidating (I know two top level climbers who fell off the Pancake flake and busted their legs). And so most people will aid more higher up, which although it slows things down, gives the body and mind a rest, which is often just what is needs by then.
Is being able to aid important?
If a climbing team are rock climbing wads, but a total nincompoops at aiding, they will often grind to a juddering hold on the top sections of the Nose, or being unnecessarily slow. Around the great roof, such people begin to come unstuck, begin to lose their confidence, their slowness slowing up other parties, which increases pressure, which leads to mistakes, more fear, more slowness. A failure to learn the basics of aid climbing is often tied to the idea it’s somehow beneath someone who can do a one arm pull up, when really that idea is as valid as Adam Ondra not learning to deploy a parachute due to climbing 9b. You need to learn the basics as you will need them, plus it’s not hard aid in anyway, but it is exposed, and you can still injure yourself if you’re clueless. If you want to be less clueless than check out my mini Aid Basics book (I’ve actually met people on the Nose reciting passages from it!).
What if you’re not a strong free climber?
So where does this leave the VS or 5.7 leader? Well it leaves you having to rely more on aid and trickery (again, it’s easy aid), and to accept you’ll go much slower than someone who can just crank-on-up (an average free pitch should take a tenth to a quarter of the time of an aid pitch… ideally).
If you are prepared to aid all that can be aided, and just free climb what can’t be, then I think a solid HVS or 5.9 climber should be fine, perhaps even lower. When I say solid, I mean that, and they should be able to climb above protection, and understand loose rock, protecting themselves and their second(s), and be confident with general problem solving. The real crux for such a climber is the Texas flake, which cannot be cheated, so it’s vital you’re solid with chimneys (some 8a climbers are not, while some 5.5 climbers are). If you are it’s a path, if you’re not then it would be very scary, and dangerous.
How tough do you need to be?
The idea of being ‘tough’ is probably odd, as most people simply focus on ‘how hard can you climb’, but a route like The Nose (and many other world class routes) require much more of you than how well your muscles can contract (toughness is also grit, fortitude and all that good stuff). Yes there are climbers who can send it in 10 hours, onsight, but the world is not full of such supermen (although comment sections are full of them), and real people are more human.
The Nose is really an alpine climb, and like any alpine route you will need to be able to hold your nerve and ‘man-up’ (women included). This toughness comes in several forms, from having the nerve to start the route in the first place (you or your partner may look for reasons not to begin), to wanting to go down on the first day, the first pitch, the first move, when things are the hardest. Some people are intimidated by wind, all the kit, the heat, or simply gravity. Very often it’s not fun, it’s not like you thought it would be, it’s stressful and scary, you might even think you’re going to die (seconding the Great Roof and lowering off a rusty peg can be a poop your pants moment). In order not to crumble you’ll need to have some backbone, and stamina for suffering (and you will suffer).
How do you get tough?
The best way to get this toughness is by having some background in alpine climbing, and very often those who endure and succeed have already endured and succeeded on other climbs. If you have no background in alpine climbing, say you only climb in the gym, then I would advise that you test your metal before trying the Nose, ideally in the months leading up to your trip to Yosemite (see training below).
How much kit do I need?
People often assumed they need a ton of specialist kit for big wall climbing, putting the route beyond them, when in fact there is very little gear that cannot be pulled together as a team (as well as begged and borrowed) or even improvised. The main pieces of specialist equipment you will need are;
Haul bag (The Fish Budget is the cheapest at $139, but you’ll need to order it in advance, or have it shipped to the Valley post office)
Wall hauler (Petzl Micro Traxion is fine)
Ascenders (Handled ascenders, one set each)
Lanyards (two each)
Aiders (Metolius pocket aiders are ideal)
Beyond that, you simply need three sets of cams if you want to aid or, or just two, if you’re happy to run it out (free or aid). I will cover the equipment needed in more detail below.
How long will it take?
I had an Irish mate who wanted to climb the Nose, but had very limited time. We met up at 1 pm on Monday, after he arrived on the bus, we slept on the wall that night at Sickle. He’d not climbed a wall before, so we climbed to Dolt ledge the next day, then up to Camp 1 the day after that, and fixed all the way to the top of the Texas flake (with two ropes), as a storm was forecast for Wednesday (the wall was empty due to the forecast). The storm passed in the night, and we climbed up to Camp 3, then Camp 4 the next day, and decided to take it easy (so we could top out in the daylight). We topped out the following afternoon (Saturday), and bivied on top (something everyone should do), and walked down Sunday, and he got the bus back Monday (and we got on Mescalito on Wednesday!).
For me, this is a more realistic schedule for your average climbing team than the often quoted three days. Yes, maybe going from camp 3 to the top will save you a day, or going sickle to Camp 1 (it’s only two pitches from Dolt), and you can get it done in three, but doing so - perhaps - reduces your chances. What I mean by this, is if you plan for three (three days water plus some spare), but get slowed down on day one, say you only get to Dolt, or push on till 3am getting to Camp 1, you’ll probably bail. Whereas taking five days water, and some spare, means you have the ability to do it in three days, or five or six.
Time-wise, I think that for most people, unless you arrive and get on the Nose on day one, two weeks is too short, and you need three or four. Two is way too short and gives very little room for manoeuvre (bad weather, jet lag, illness, sunstroke, dropping the car keys.
A two-week trip tends to give you enough time to get over jet lag, get a turn in the queue for the route, fix lines, take your time on the route, and not have to rush and stress or add in a factor to an already difficult objective.
This amount of time also allows you time for some false starts, low retreats and a warm-up (if it’s safe, climbing the East Buttress on El Cap can give you a heads up on the descent for example, and just getting used to the rock is a good idea).
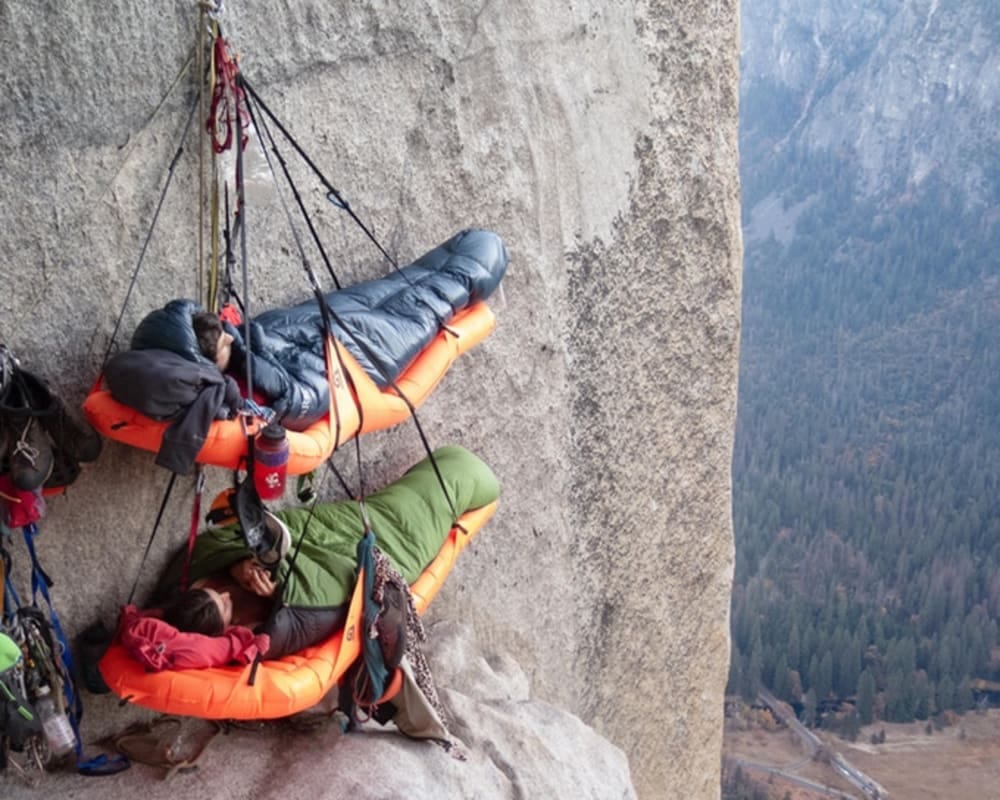
Do I need a portaledge?
If you have a portaledge you camp anywhere, which means you’re dependant of slow parties clearing off ledges, or blocking you from getting to a flat ledge for the night. They also offer much greater storm protection (you can sit out storms that send other parties down), and remove an element of stress that could see you fail.
But on the flipside, a ledge makes you slower, both as it adds more weight, but also that you don’t have the same drive to push on between ledges. This isn’t a bad thing as long as you plan on a leisurely ascent.
A double ledge for a three-person teams means tiny ledges for one (such as Sickle), can be used, or all three can sit on the ledge in an emergency.
An alternative is the new G7 Pod, which is much lighter, more compact, and doubles up as your mat. Just having one of these could make a big difference (just make sure you take off your nut tool!).
If you don’t have a portaledge, you can at least have the full big wall experience, although, be warned that many of the ledges are not great for a team of two or three, with each tending to have one prime spot, and them several slopey/lumpy spots.
What about the crowds?
The main thing to remember is that 50%, if not 90%, of the people you’re jostling position with, are going to bail by Dolt Tower. Yes, they’ll somehow get up to Sickle, fix their ropes, have an epic getting their bags up there, slow everyone down around them; but once they start getting over to the Stove Legs, both the climbing and the seconding, hauling and lowering out, their psyche will crumble. Added to this is that you have rap anchors all the way down the wall from there. Who could resist that?
So I tend to view this part of the process like the swimming segment of a triathlon, where it’s all pushing and shoving, drama and stress, but where nearly the entire field drowns about fifty metres out (or drags their sorry asses to the shore!).
The trick is to be fast and early, the former not easy if you’ve not climbed a wall before, the latter easy if you have a watch. The aim to be at the base of the 1st pitch before dawn (you will probably not be the only one), the 1st pitch the one above the Footstool (this is a ‘solo’, but I would pitch it still, as people drop crap down the wall, it has some loose bits, and you don’t want to die on the Nose on the approach).
You also need to work out who is doing what at the base. This can be broken down into:
Dolt Run: Just climbing up to Dolt than rapping down again, either to train for a one-day ascent or just for giggles.
Speed ascent: This party will range from some dope-smoking locals, hoping to do a sub-five-hour ascent, to people who look as if they’re about to storm Omaha beach. Hopefully, speed climbers will be fast - but not always - but let them pass. If they slow you down high on the route, then you can ask them to fix a rope for you (but only if they look trustworthy!)
Multi day teamsThese are the guys you need to get ahead of, as a high percentage will be bloody slow and useless (and so could you).
Fixers: You will also encounter people who have fixed to sickle, and are heading up to haul (or get their ropes down, as they’ve had second thoughts.
Bailers: Teams who are doing the walk of shame, having bailed down Dolt tower before the sun came up.
Tourons: You will find these at the base at all hours, just looking, and it’s worth working out the difference between them and actual competition, as they can add unnecessary stress.
So the basics are to climb up to Sickle on day one, which can be tough, as here is the hardest climbing for many people, plus the hottest, and fix down from Sickle with three ropes.
An alternative to getting up at 4 am, is to go up at 4 pm, climb Pine Line (nice little route), and fix pitch one. This means you can walk around to the Pine line ledge at 4 am (you can ‘probably’ sleep up there), and get onto the route and bypass parties (the 1st pitch is also one of the most polished and weird).
If you’ve not got your heart totally set on the Nose, the Triple Direct is another option (a mash-up of the Salathe, Muir and Nose), but this requires some more solid free skills for the Free Blast (it’s not free and it’s not a blast).
What about fixing?
The number one bit of advice from me would NEVER haul up the first pitches to Sickle, as it takes forever and increases your chances of failure dramatically (and slows everyone up). Last time I was in the Valley we climbed Grape Race, which climbs those first pitches up to Sickle, then goes left, and so we had to haul (we fixed to pitch one, then hauled from the Pine Line ledge). As we had our bags on pitch one, everyone seemed to assume that was the way to do it, and so within 24 hours, every single belay had haul bags hanging off it, each and everyone having some kind of fuck-up when lowering out to Sickle. The result, even after all that pain, was every single team bailed after wasting two or three days of perfect weather (I did tell them, but they thought I was being an asshole).
Once you fix to Sickle, you should get on your ropes as soon as you can, ideally the following morning (although some people will be fried). Yes people might use your ropes (go up or down them), but if set up right they’ll be fine.
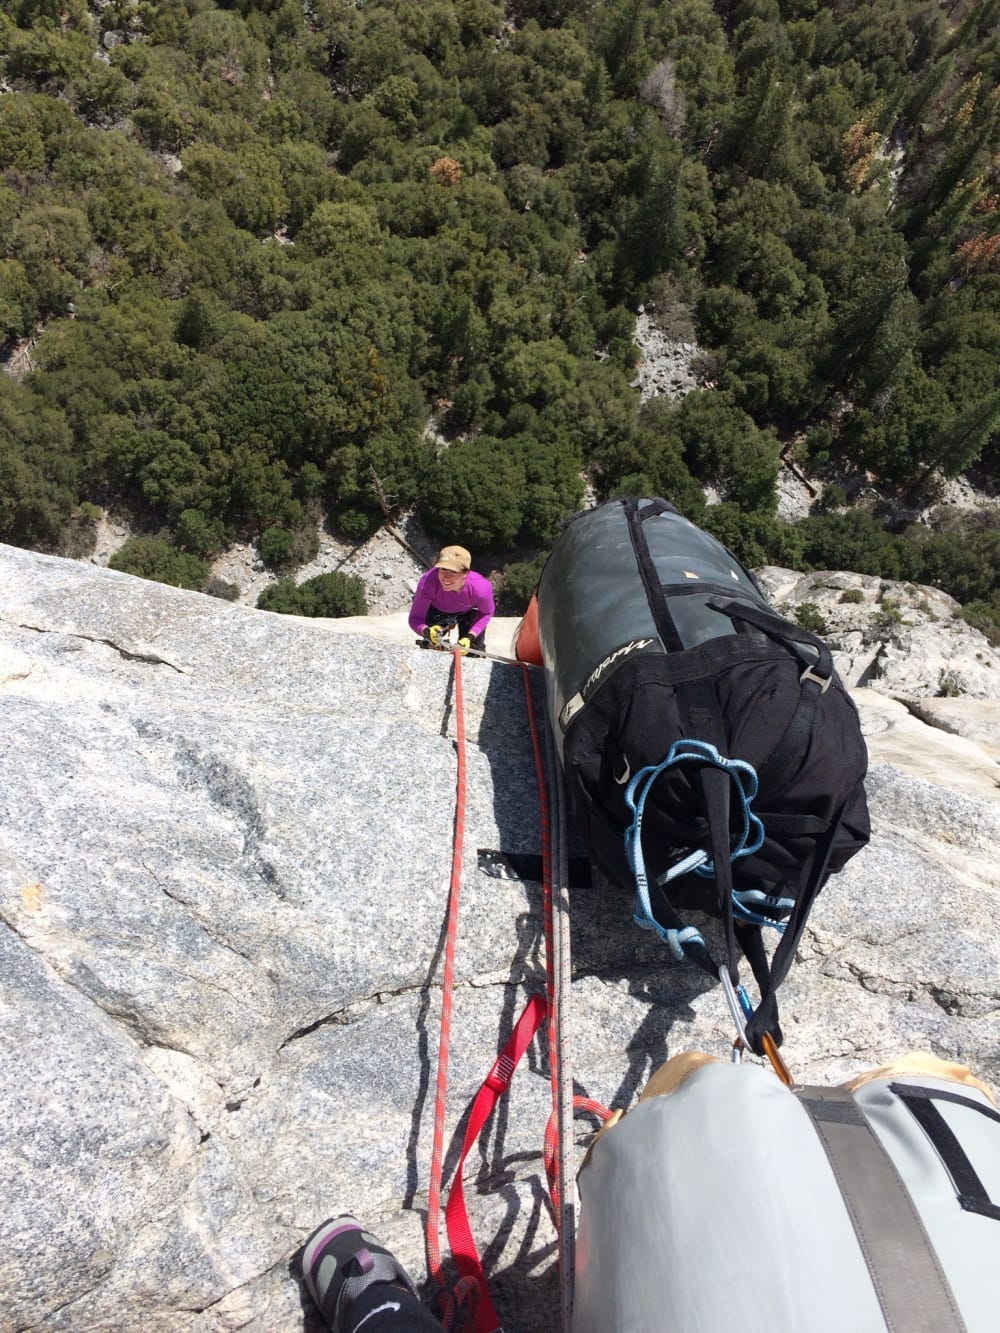
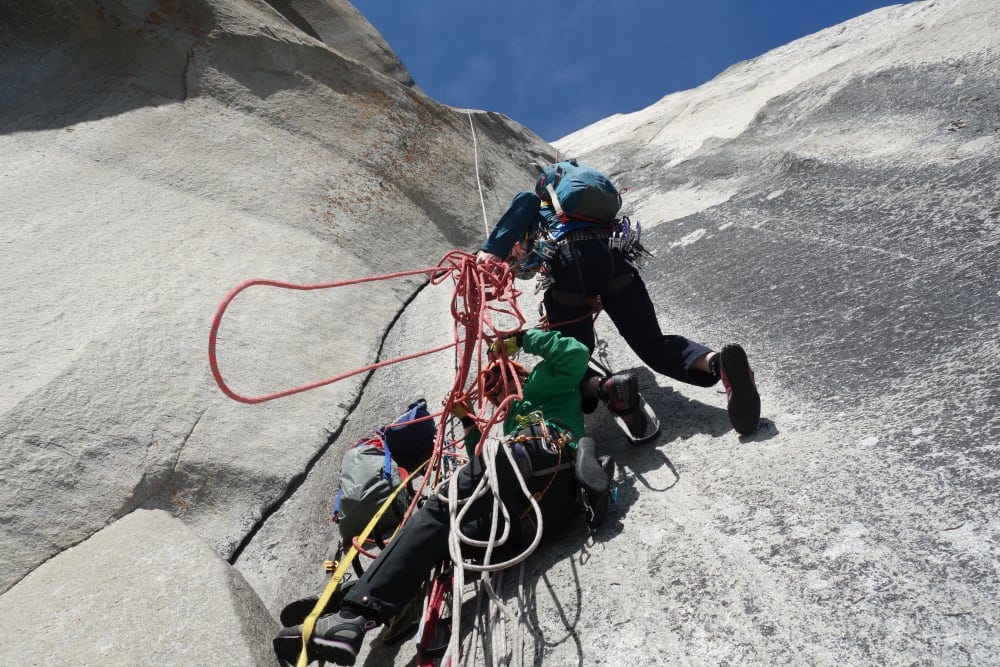
You need three 60 metre ropes to haul up from the ground, which means you might need to take a lead line, haul line, and spare line, both to lower out, jug and haul. This could be a half rope you take up with you, or a rope you drop (to be picked up), or left at the first anchor.
How you’d do this is with a two person team is (with three sixty metre ropes fixed down from Sickle), is:
Climber A jugs the first line (line 1) and waits at the 1st anchor
Climber B attaches line 1 to the haul bag with the end of the fixed line.
Climber B jugs line 1 to 1st anchor
Climber B starts to haul
Climber A jugs line 2 to 2nd anchor with the end of line 1 (or they wait for the bag to be up).
Climber A hauls bag to anchor 2 using line 1 after climber B releases it
Climber B climbs line 2 as A hauls
Climber B takes the end of line 1 and climbs to anchor 3 (Sickle)
Climber A climbs to anchor 3 as B hauls
Line 1 is replaced by haul line, and either taken as the lower out line, dropped to a waiting friend and shorter lower out used)
Needless to say there are many ways of doing this, and I have just hauled the entire thing in one (passing knots), but this often requires someone on the ground to guide the bags over a tiny little roof (unless you use a hauling cone).
When fixing ropes, study the technique of re-belaying (used in SRT), and no rope should go fully from one anchor to the next, but ideally clipped off to a bolt along the way. This is done by the last person down, and allows more than one person to be on a rope when climbing back up, and reduces the chances of rope damage due to shite jumaring skills.
When training for the Nose, I would incorporate some practising of passing knots with both descenders and ascenders.
Is the hauling hellacious?
When you go on a wall for 14 days with a team of four, where you still have gallons of water left at the end, that’s only slightly hellacious, so no, it’s piss easy; if it isn’t, you’re just a lightweight who’s not put the training hours in!
You should only have one large haul bag, even for a three-person team, with a maximum of five days of water (so 15 water rations for three people), which is not that heavy, especially if you don’t have a portaledge, fly etc. The higher you get, the steeper the wall, the lighter the bag, the easier it is, so keep that in mind. Don’t be an idiot and try hauling the bag with the haul line running over ledges (such as Sickle, Dolt, Camp 1 etc), and always extend the hauler so the haul line goes directly to the bag (unless you have no option); your muscles and rope will thank you for it. Once the bag is at the hauler, you can just pull them onto the ledge. Learn to do the ‘power walk’ and put the heaviest climber on haul duty to begin with (not the 50kg V12 vegan). Learn space hauling, but try to avoid using it, and often just having someone else pulling on the ropes as you power walk down the wall is all that’s needed.
How much does it cost?
Flying out to California and climbing The Nose may seem like an expensive trip, but I think it compares favourably with a trip to the Alps or other destinations once you take into account both the weather (less money spent on wet weather days), the quality of the climbing and the lower cost of things in the US.
Flights to San Francisco or L.A can be picked up cheaply, and car hire can be shared amongst a team making it cheaper than using trains and buses to get there (but that’s still a good option, but you might end up having to factor in staying overnight somewhere on the way there and on the way back).
Having a hire car also means you can get to the valley in 4 hours, allowing you to get started on the climb as soon as possible, and allows you to buy food and water bottles on the way to the valley (there are several Wallmarts on the way), which keeps the cost down (food in the valley can be considerably more expensive). Having a car gives you a safe place to store your kit when on the wall, or in a campsite (there are thieves around), and makes it easier to get all your big wall crap to and from the wall (vital if you’re climbing out of season when the bus no longer goes down to the bridge).
What about the camping?
Camping in Camp 4 in Yosemite is very cheap, and experience, sometimes positive, and sometimes negative, but requires a lot of hurdles to jump. The biggest one has always been getting a place. In the past you had to queue from about 5 am, with no guarantee you’d get a place, and like all campsites, it’s always best to check in on a Monday morning and avoid holidays. You’re also limited how long you can stay in the peak season, which is why it’s best climb in the Autumn, when it’s both cooler, less busy, and you can stay as long as you want.
Although I’ve spent months in Camp 4, of late I’ve found it’s been a bit of a shit hole when out of season (sorry), with just a free for all for spaces (if you can find an inch of room in a bear box, you can move in), with the toilets and sink (and single tap for 150++ people) getting pretty bad. The low cost keeps people coming, and it’s slowly changed from a climber/walker site, to just a site for anyone who’s got no money, with big families, and random psychos often spoiling the dream. But it is what it is. At the moment they’ve switched to a lottery system, which going by how most things are implemented in the valley, I’m sure it’ll be a total unworkable fucking disaster.
Alternatives to camp 4?
Although I do sometimes stay in Camp 4, it’s often more for the benefit of partners who want to live the dream. But mainly I stay at sites further away, both inside and outside the park, which tend to be easier to book into (rangers don’t treat you like animal scum), and sometimes cooler, with camping up in the meadows being really nice (but expensive unless you’re in a big group).
I’ve also done quite a bit of camping ‘elsewhere’, and there are lots of good spots for this, as the days of rangers hunting with IR goggles seem to be long gone. The problem with this kind of illegal camping is it’s not camping, it’s just bivvying, so you need a car, and don’t have somewhere to hang out. This means this is only an option if you’re desperate and can’t find anywhere to sleep for the night (if you get in on the bus in the evening and have no site, what do you do?).
While we’re on the subject, always bring in all your stove fuel and insect repellent (vital in the summer), as the stock system used in the park is based on not having stock, meaning a long trip out of the park to get gas.
Topos
Before I start, I should note that there are dozens and dozens of topos for the Nose, both online and in guide books. Some are very outdated, some are graded for a free ascent, or a NIAD (Nose in a day), and some have inaccurate information (missing bolts, or bolts that are now missing). Basically, the Nose is a big alpine wall that is changing in small ways all the time, and no one should slavishly study a topo (or this article), and imagine that is exactly what they will find.
Fixed and missing gear
There are certain spots on the Nose that seem to act as a magnet for fixed gear, such as the Stovelegs, the Great Roof, the Glowering spot. Due to Yosemite having a very dry climate, much of this gear is in good condition, under the great roof and around Camp 4 the only wet spots. It is important to eyeball all fixed gear, especially if you’re going to clip it as pro (and save your gear), as some gear is not so good, or simply not stuck at all, but just gear that’s been dropped down the wall or gear that’s been missed when cleaning. Also check the quality of any cordage or slings, as these can snap, and so you need to check their security (if they’re bad, cut them away and replace them, or if that’s not possible, larks foot in a sling above the knot). If you come across a rapid-link or fixed karabiners then it generally means that this is a lower-off/lower-out and should be left (some people will also lower off small loops of webbing, and these should always be viewed with suspicion. You will also come across fixed gear with long slings or cord attached to them, such as on the bolts on the Changing corners. These are to aid speed climbers (sort of cheating at cheating). I always carry a lightweight hammer on the Nose and hammer out all fixed gear if I can (you often need this for your own nuts), which is a bummer if you’re trying to break a record, but this is one of the best climbs on the planet, not a via-ferrata.
Timings
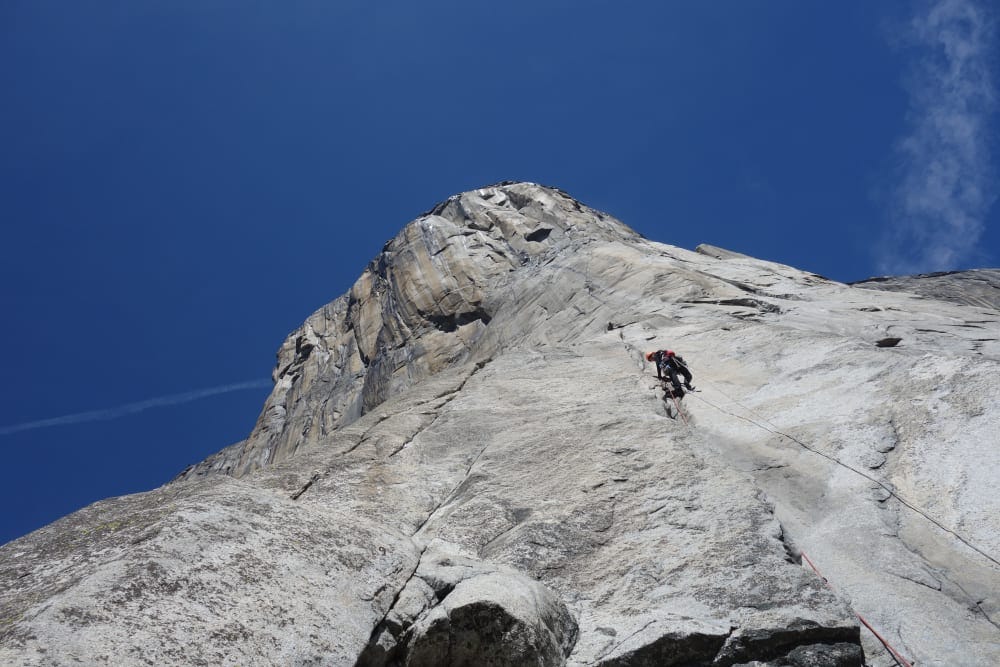
You should be aiming at climbing all pitches under one hour (on average, as some will go faster than others). If they’re taking two then maybe you need to practice so more, or be prepared for a long haul (as should those behind you). If it’s three or more (I’ve seen a team only climb two pitches on Dolt tower in a whole day), then you need to rethink things (it’s dangerous and no fun for you, or anyone who gets close to you). I’ll cover gear in the next part, but it’s recommended you carry a watch (around your neck or on your harness), and keep an eye on it.
The Nose, pitch by pitch
Approach pitch
For some reason, someone put the 1st pitch of the Nose too high to reach without climbing something to get there, meaning you can either get there via the Footstool (4th class), which is just a scramble, or via Pine Line (5.7), which is trickier than it looks when carrying a big rack (belay at the tree, or climb up to the 1st belay in a single pitch, the bit after the tree harder than 5.7). Some people just solo the Footstool, but I think it’s best to pitch it, as it can be a little bit dirty and sandy, and people often drop things down the line. Do not try and haul the Footstool as you’ll probably kill someone at the base by knocking something off (the base gets a lot of traffic), and if you must, then haul from the top of pitch 1 via the Pine Line ledge (this might be one 60 metre rope, but don’t quote me on that).
Pitch 1 (5.10d or C1 obligatory 5.7)
This is a wake-up call for climbers who think they’re going to either free most of the Nose or aid the whole thing, as it’s neither easy to aid or free! This means a lot of Nose dreams come to a dead stop at this point. The pitch is awkward, polished, greasy, and just a bit nasty at 5 am with two Argentinians trying to pass you out; but don’t let that put you off!
The best approach is to free what you can and aid what you can’t (‘free as can be’), which means some awkward aiding down low, then free and french free (A0), higher up. The trick with mixed aid and free is to wear rock boots, chalk bag, and have your crack jammie on, but don’t get sucked into the crack, or into aid mode, but keep an eye out for good holds for hands and feet. The skill is being able to switch into free mode and back again, and if you can just grab a hold and free climb up a metre of so, you can save ten or so minutes right there (practise this before pitch one of the Nose). It’s important that you know how to step high on your gear on these pitches (again, don’t neglect handholds), as this will allow you to bypass some bad placements (flared peg scars). It’s on this pitch were you might need some microwires and offset cams (fixed gears changes, so are the lengths of slings hanging of the gear). Remember you’re in California; if in doubt, get high.
Pitch 2 (C1+)
This is another free as it can be pitch, with a tricky free move off the ledge, up a corner, then a tension right, but easier than pitch 1. You can run this pitch with pitch 3 if you want, but you will have to use long slings and back-clean, so it’s probably best not to.
Pitch 3 (5.10 or C2 obligatory 5.7)
This can be a bit awkward to start, as it’s hard to figure out if you should go up the left or the right features, but you can do either, but a free approach is best. There can be a few tricky blank spots up here that stumps people, and I’ve had people use a hand placed beak in a funny little flared peg scar to get past a spot that used to hold a peg (there might be a bolt here now). The crux comes at the end, which is some 5.7 slab that appears to be much harder (but isn’t). If you have some offset cams, you’ll use them here.
Pitch 4 (C2 obligatory 5.7)
Climb up the corner, then up some bolts to piece and lower off and swing right, get gear in, and climb up, back cleaning as you go, then lower off the top piece and swing right again to a corner that leads up onto Sickle. This pitch is going to require your second to lower off twice, so you need to know how to do this (and have practised it!), as fucking it up will bring your ascent to a juddering halt.
Leave gear in once you get to Sickle ledge, clipping the bolt as well, and move along to the belay (watch out for loose rock).
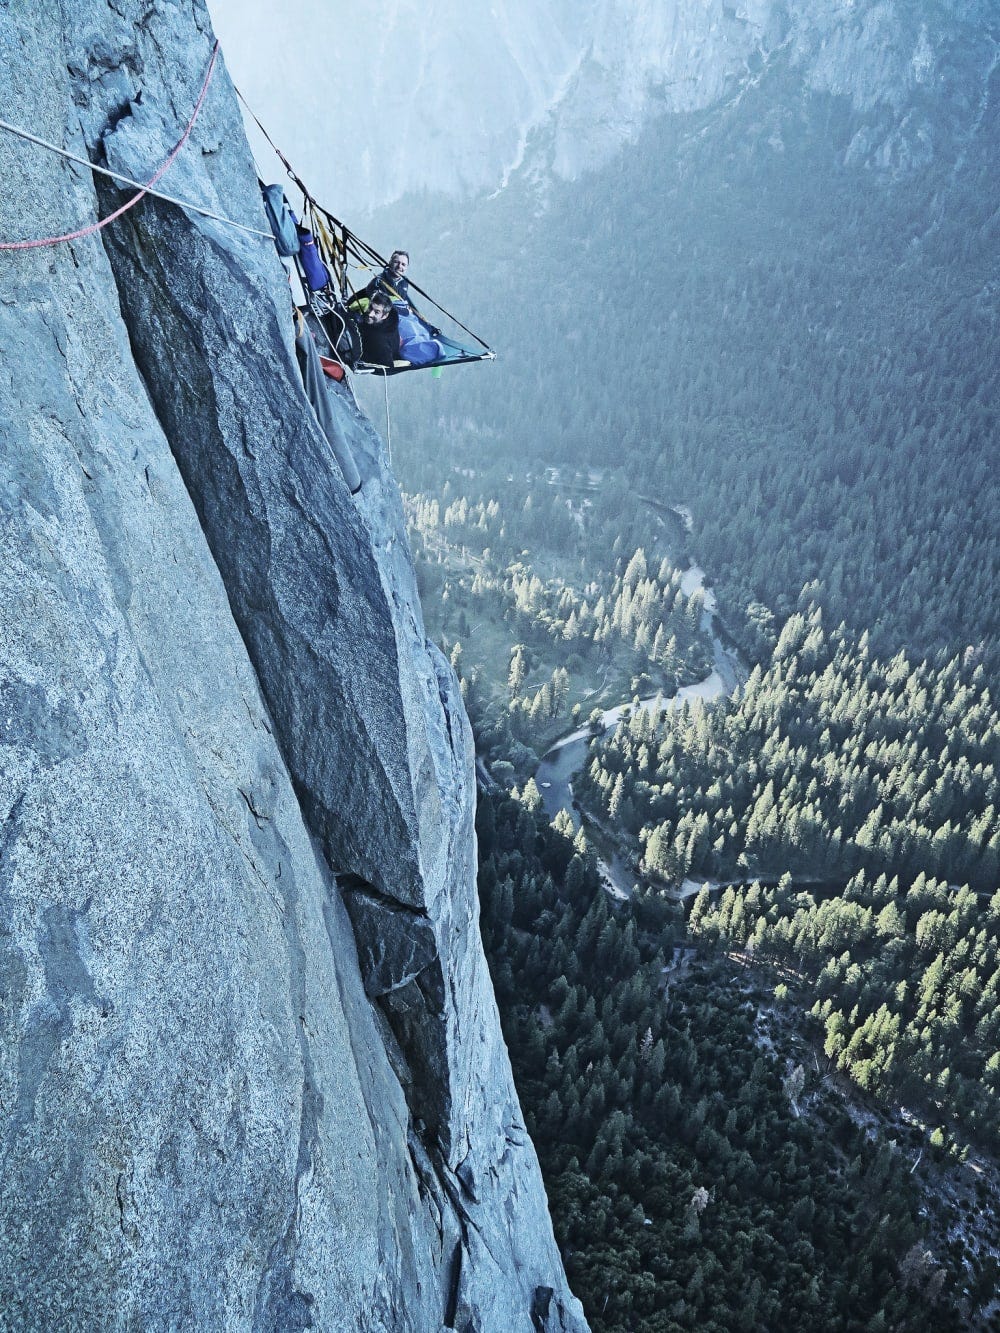
There are two belays on Sickle, a high and low belay, and most people use the lower belay (fix and haul from here, and if you’re crap at jumaring then protect the rope where it goes over the edge). There is enough room for one person to sleep here semi comfortably. Be prepared for early morning guests.
When we climbed it in winter, three of us had never done a big wall or aided before, and so it took three days to reach sickle. On the first morning there, a speed team passed us and told it had taken them 14 minutes to reach the same spot.
Pitch 5 and 6 (4th class / 5.9 C1)
Easy scrambling (beware of loose rock) that gets steeper at the top. Don’t neglect to place some gear on the easy section to safeguard the second. Most people aid at the top to reach the belay. I always run these pitches together, but it’s a stretch. To haul from 4 to 6 either requires a lower out line or allowing the bag to be lowered out on what is left of the haul line (bag tied off short), which will result in the bag smashing across the wall. Or you can just climb to 5 and play it safe. If climbing as a three, the two seconds can either jug the lead line one at a time, or one can jug the haul line before the bags are lowered out.
Pitch 7 (5.9 A0)
This is a tricky pitch, but fun (do not go straight up to Dolt Hole, that way seems to just suck the life/daylight out of people). Aid across the wall going right (bolts), and then lower down and swing into a V groove (5.6) and climb up as if you’re on a top rope to a few aid moves (back clean). Get some protection at the top, then aid and free climb right (fun free climbing, tension and A0), until you get to a crack, and then aid or free up to a double bolt belay (this belay is pretty level with the last belay). This is another tricky pitch to follow, and you need to have your wits about you (a third climber should be lowered out on the haul line). Below this belay are the rap stations going down Dolt tower, and it’s possible to fix from here, but only if you have four ropes.
Pitch 8/9 (C1 5.8)
Climb the Stove Leg crack; clipping fixed cams and your own. The free climbing is harder than it looks and very exposed (I’ve seen strong men grow week here and bail). You will also get some windy weather here on most days, and it’s here you need to have some good rope management skills (use some form of rope bag for each rope). It’s also a spot for traffic jams, people bailing or just flailing around. If you have a ledge, then stick it up if you’re stuck here, as it will reduce the chances of you losing all hope.
Pitch 10 (5.8 C1)
This begins with some easy free climbing or awkward aid, or a mix of the two then goes up into a wide section (blue cams). This belay isn’t a good one to be stuck at.
Pitch 11 (5.10b or 5.8 C1)
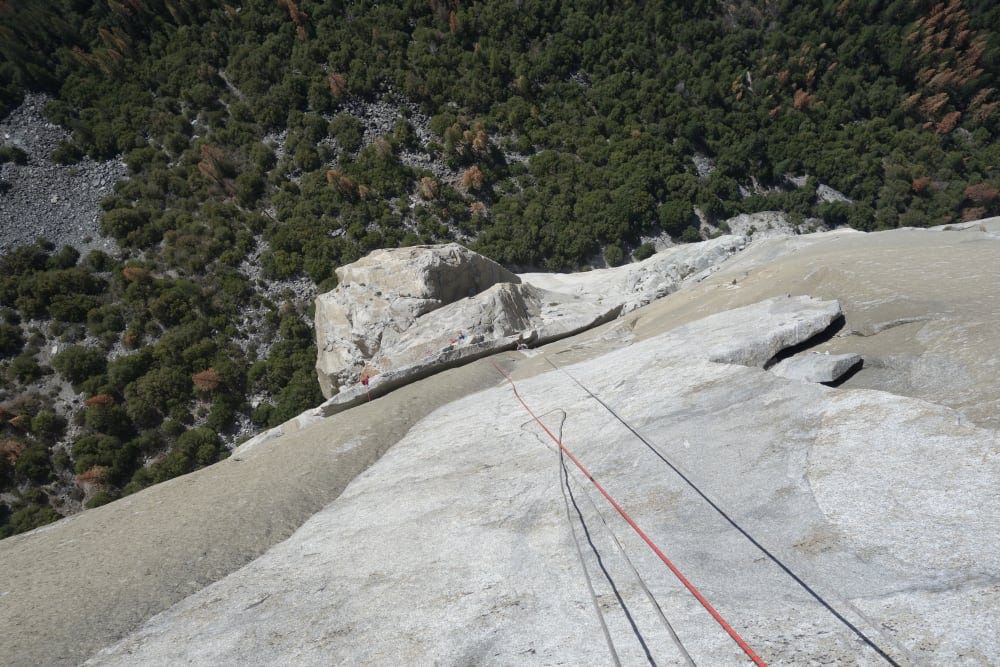
A wide crack with some bolts. You will reach a belay close to the top of the pillar, with only a few moves to the top, climb past this. When hauling from the top, set up your hauler over the edge, then drag the bags over onto the ledge (don’t have your ropes running over the edge of the ledge). Dolt tower is a good bivy, with a good spot for one climber, and a slopey spot for two, and a few less good spots around. If you reach this spot, then you should get to the top, as you’ve now done the most technical parts of the Nose. This ledge tends to have a permanent supply of water on it, as people dump it before bailing, so don’t allow other slowing you up below be a reason for bailing as well. The elephant in the room here is that you’ve got a bolted rap line going all the way to the ground belay you, but don’t allow that dissolve your resolve. If you get here with some light left, fix the next two pitches in order to stave off weakness in the morning (or push on to Camp 1, which is nicer).
Pitch 12/13 (5.8 C1)
Move to belay to the right-hand end of the ledge, then lower off the lower bolt. Pendulum right into cracks and flakes, and free climb, back clean, until you reach the belay (pitch 12). Clip the belay, and climb the next pitch free (5.9 fists), or aid it on big cams (easy). If back cleaning, don’t forget to leave some pro at the top, before free climbing up to the belay. If you don’t want to back-clean the lower pitch, then it’s best not to run the two together, as your second might run out of rope lowering out to clean it.
When hauling this pitch, there are a few spots where the bags can get a little hung up (one of the few places on the Nose), so make sure the bags are well packed and the tops drawn up to make then less sticky (so smooth and curved like a bullet, not like a bucket!). If they get stuck, lower then down a little, and have one of the climbers jiggle them as you haul, or try and pull the haul line left and right.
Pitch 14 (5.7)
This is an easy scrambling pitch. Set up the haul line on the left-hand end of the ledge, and place enough gear, so your second doesn’t swing off the traverse.
You can also do the Jardine Traverse here (5.10c or 5.9 C1 wide), which speeds things up but misses out Camp 1, the Texas and Boot flake, and the King Swing, which are all the highlights of the climb. The Jardine is also tougher than it sounds, and you need some big cams (it has a long wide section that climbs up to where the King swing comes in, which needs monster cams, although this is not mentioned on the topo).
You’re now at Camp 1, which is a really cool ledge. If you make it here in one day, you’re moving well and should do the rest with one bivy.

Pitch 15 (part 1) (5.9 or C1)
This is an easy pitch but beware of all the loose rock at the top, as this could kill someone (on the camp 1 ledge or on the ground). Belay at a bolt anchor at the base of the Texas flake, or run this pitch together (I think it’s best to split it).

Pitch 15 (part 2) (5.9 slot and obligatory 5.8 chimney)
Climb into the flake (easier to free climb than aid), and squeeze in below a bolt on the outside of the flake. Climb up to this (easy), then - with your back to the flake - go left to some small footholds, and follow them upwards, back and footing. The footholds run out at the top, but one more move will see you close enough to reach a rivet on top of the flake if you need it (you have to clip it behind your head), then climb up onto the top of the flake and clip the belay. If you’re speed climbing, then don’t clip the bolt in the flake, but have both ropes running on the outside to aid speed. On a winter ascent of the Nose, this pitch was full of verglas, so we used the fly pole to clip the mid bolt, then two walking poles and the fly pole to clip the belay (much harder than it sounds). People have fallen off and had to be rescued from the Texas flake, so take it seriously, i.e. wear your rock boots and leave your rack behind (you just need belay kit and some draws). Belaying at the base of the flake also reduces drag. Make sure you flip your haul line around to the front of the flake, and if you miss out the bolt then you can flip that out as well (this makes seconding much easier). This pitch is a good one to fix if you get to Camp 1 early.
Pitch 16 ( C1)
This is a spectacular pitch, and good for hero photos (both for the leader and the second on top of the flake). Climb the easy bolt ladder (you can back clean the first lot of bolts and just lower off the belay when seconding), then up into the flake. A few cam hook moves get you up into the flake proper, that can be aided or laybacked. Be careful at the very top as there is a big detached section (just be aware where you cams are going, as these things have a habit of just falling off).
Twice I’ve actually fixed from this belay down to camp 1 using two 60 metre ropes, once during the winter climb, and once when a big storm was forecast (we actually fixed all the way to 17 with two ropes). You can fix down to the Texas flake, then down to camp 1, then in the morning leave the bags sitting on camp 1, and jug up, removing the belay on top of the Texas flake, then haul all the way to the top off the Boot (you need to know how to pass a knot).
Pitch 17 (ungradable)
This is the famous King Swing! The advice from Erik Sloan’s guide (Yosemite Big Walls) is spot on, including leaving your rack behind and your haul line (the topo says to take a Camalot 4, but you should be able to just climb onto the belay ledge). You can either do this conventionally, i.e. swinging around, starting at the last bolt below Boot Flake, or you can do it statically. Make sure you have the rope flipped around the edge of the boot top, not over the top, and carry some ascenders in case you go too far (being lowered off a Grigri connected to the belay also takes the strain off the belayer). The thing to remember is that the point you’re heading for is just above the triangular roof. Make sure you have your rock boots on and your chalk bag.
To do it without the swing, just lower to the bolt, then free climb across (your body at 45 degrees), using tension from the rope, using tiny flakes and edges, until you reach a sideways jug, which allows you to reach the arete.
An alternative is to swing early into a groove that leads down towards the triangle roof, but this needs a careful belay (go too fast, and you’ll fall off).
Once you get around the corner, you can climb up easily onto a belay ledge.
Now slide down the rack via the haul line clipped into the lead line.
To avoid all the hassle of lowering the bag down to this belay, begin free climbing/aiding/back cleaning up to the next belay. If you mess up early on you’ll end up swinging back around on a top rope, but do this higher, and you’ll hurt yourself (you’ll smash into the Boot, so make sure you’ve always got one piece in below you as you back clean, and take it slow. There’s a bit of looseness at the very top, but you can place a few pieces, get onto the ledge, and reach back to get them.
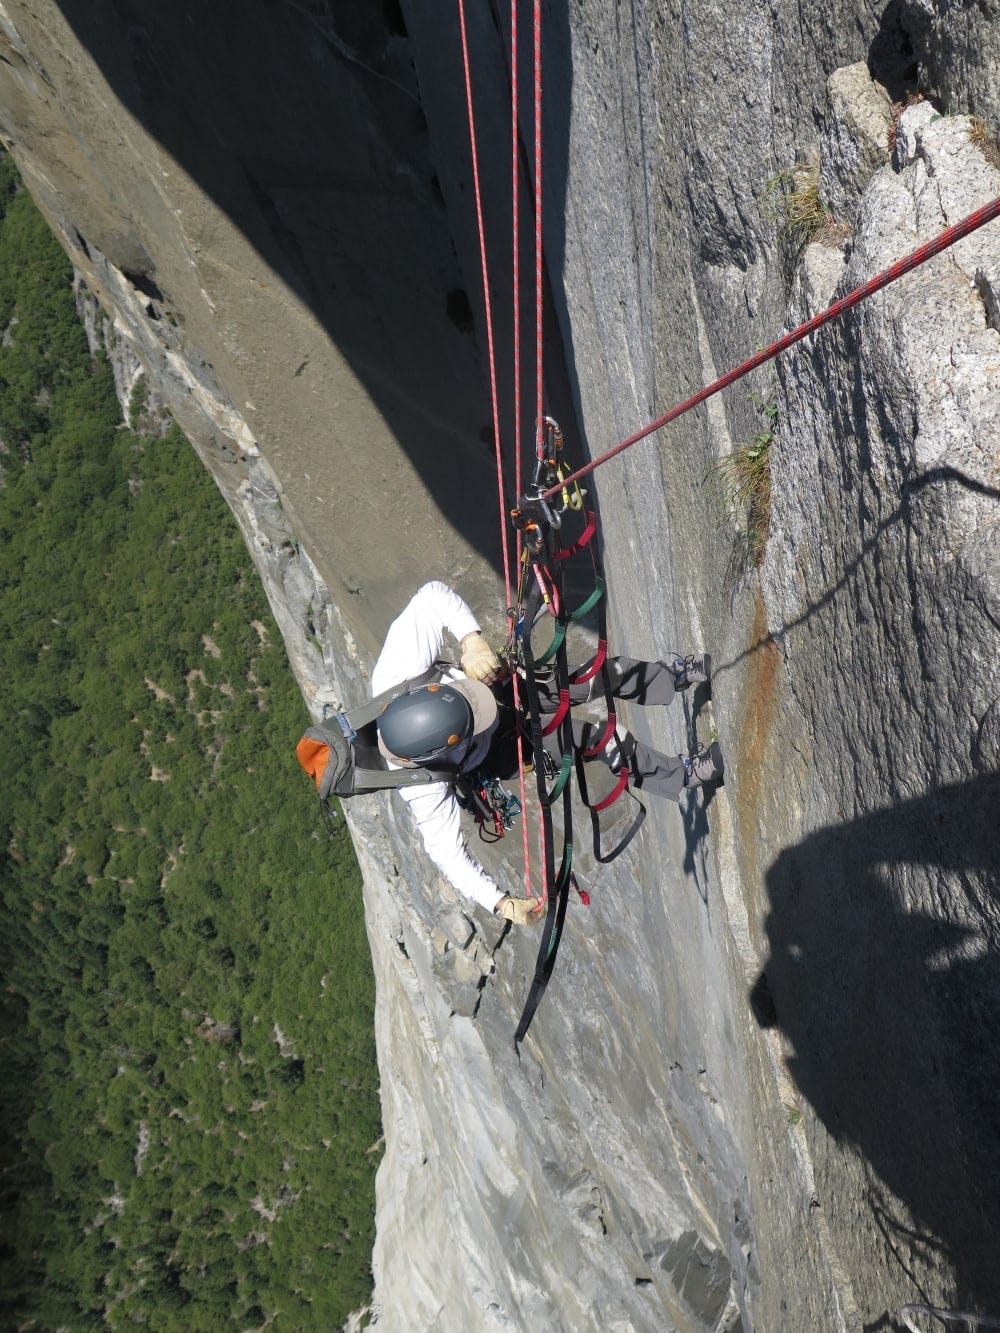
Once at pitch 17, lower out the haul bags and haul them up (haul as they are being lowered, so they don’t drop too far), and have the second lower off the Boot belay (if you’re climbing as a three, lower out the third climber). When lowering out in this way, don’t just depend on your jumars, as the angles are pretty extreme, and take it slowly and think it through (I had one partner lower out, only to realise, too late, that his ascenders were upside down!).
Pitch 18/19 (5.9 C1)
This begins with straight forward free climbing up some dodgy (flakes be careful), then gets harder, leading up to the Lynn Hill traverse (you are linking two pitches here, but you can belay here at the intermediate belay). If you continue up (use bolts near traverse), beware of huge hanging block pinned in by pegs, and aid to a lower off. As you’re lowered, back clean as many pieces as you can, so your partner can just swing left to the belay.
If you go the Lynn Hill way, beware that it’s tougher than it looks, and the bolts are too spaced to aid across. The climbing is 10D, and gets harder at the end, when the bolts run out, but can be aided with a skyhook (the only place you might want a hook on the Nose). An extra bolt might be here now, negating the hook.
Pitch 19/20 (obligatory 5.7 C1)
This is a mix of scrambling, easy climbing and awkward free/aid at the top, but features some loose rock, so be careful. Again, it’s a tricky one to second, requiring a mix of lowering off and climbing/scrambling (stand on the bolt near the end of the pitch).
This puts you at Camp 2, which is a poor bivy, but there are better spots lower down on the ledges that traverse over from the Triple Direct (which joins the wall at this point), and a good spot on the traverse you’ve just done (you can rap down and sleep, then jug back up).
Hauling to here requires the bags to be lowered out across the Grey ledges, but you can haul from 21 Instead. In a three-person system then means one climber must stay with the bags, and then release the bags once the climbers have reached pitch 21, then climb the lead rope up to them. An alternative would be to leave the bags hanging off a fifi hook and haul it remotely, but this would be an advanced technique.
Pitch 21 (obligatory 5.7 C1)
This is a fun pitch, but also one to be wary off, as it’s also a leg breaker. Wear your rock boots and climb up on the left-hand side of the ledge, and traverse right above it (one tricky step), then up some fragile flakes to a peg, from here, tension over and free/french up to the next belay (some good flakes for hands and feet).
Pitch 22 (C1 5.7)
You’re now at the famous Great Roof! This is easy aid (many fixed pieces), up to the roof (use fixed gear for pro). Try and keep two sets of small cams for the roof section (place nuts and spare cams in the crack below), and use these to cross the roof, perhaps using a cam hook along the way. If you dare, just clip the fixed gear, or leave pieces near fixed gear (you cannot clean a piece you have to lower further than arm’s length from). At the end, do a free move or two to reach the belay (amazing position, and great for photos!).
Pitch 23 (C1)
The famous Pancake flake. This is easy aid, or mind-blowing free climbing (if you dare), but being uniform, you should place gear when you can. This is a place where Link cams work well. The climbing gets harder at the very top, requiring a mix of free climbing and small cams to reach the belay.
Pitch 24 (C1+ 5.6)
Free climb up and then tackles the horrid slot, going out left to another crack as soon as you can reach it. This leads back into the slot again, but then falls back and leads to greasy scramble up to a blissful Camp 3. Haul from the far left-hand end of the belay, and if in a three-person team, have one climber just the haul line first (on which they might pooh their pants).
If you get here late in the day, but with time to spare, consider fixing the next pitch, or knocking off the next two to Camp 4. But if you’ve got plenty of water, then take it easy and just enjoy one of the best ledges on the planet.
Pitch 25 (5.7 C1)
The is the Glowering Spot, which requires a little care, as it’s more technical aid than other pitches, and above a ledge, so a potential leg breaker. Scramble up to the crack (place some gear), then aid the crack on small wires. Sometimes they’re all fixed in place, sometimes not (well, not after I cleaned them all out), but just take it easy. After five or six placements you can get solid cams in the grassy corner to the right, then go up the corner to a good small ledge. The aid is easy, but people sometimes get complacent on the Nose and forget that one piece ripping can see you hit a ledge.
Pitch 26 (C1 5.7)
Aid and free climb up the corner, then into a lumpy section of wall, often smelly (big cams as pro), until you can free climb up to Camp 4 (go up the face, not the wide crack). Camp 4 is good bivy, but not as good as 3. If you’re using a ledge, then consider placing it off from the belay itself, as any speed climbers will have to step on you at 2am to get passed (I’ve both done this, and had it done to me). This is not a good place to be in a storm, and if a storm is due, you’d be better to fix down to Camp 3 or climb up and bivy at the next belay (if you have a ledge). Note: do not leave any trash here, and beware of stuff falling down the crack at the back of the ledge (I dropped my wife’s Guide Tennie down there, but somehow managed to fish it out, finding a red Alien as a reward).

Pitch 27 (C1)
Steep and long, but not that hard. The technical bit is getting into the Changing Corners section, which requires small cams and nuts (some fixed gear), then easy aid up to a hanging belay.
Pitch 28 (C1 5.8)
This is a steep and horrible belay if your feet are tired. The pitch goes up an amazing crack on small-medium cams, then around a crack (fixed bong), then up a corner (free and aid), to a good belay. These two pitches can be a bottleneck, and last time I was here, we had eight climbers hanging from two bolts here!
Pitch 29 (C1 5.6)
This is another cool pitch, which is aid and free, up an easy crack to a groove, up this to some bolts and some technical aid (cams), until you can pull around onto a belay. It is possible to climb up higher, but there isn’t really a belay up there, and you have to make a belay off the bolt ladder, so best stay here. This is also the most exposed belay on the planet, so take lots of photos while leading the next pitch.
Pitch 30/31 (C1 5.5)
Combine a short easy aid crack (use long slings) into the finishing bolt ladder. This is easy stuff (some speed climbers just go up the bolts by hooking them with their sausage fingers), but can be intimidating and tiring, so adjustable lanyards help. You don’t want tons of rope drag, so be smart with what you clip, and what you use to clip it with (all the bolts are bomber). There is one actual placement as you traverse back right on the bolts (look out for original belay with Star drive-ins), then easy free climbing up then back left to the belay on the slab. If you’ve got a lot of rope drag, this can be tough! The final pitch can be easy or hard to haul, depending on the weight of the bag, and a real treat for a third climber is they have to jug the haul line, but someone will be required to get the bag over the edge.
Pitch 32 (4th class)
Someone should scramble up and secure the ropes to the tree, and haul the bags as the second person drags/manhandles them over the ledgy ground.
Once on the summit, you have plenty of great spots to take off your kit and go crazy, with some sheltered spots and BASE bivvies over to the right. I would always recommend sleeping at the top of the wall and walking up to the summit for sunrise. It’s quite a spot!
Getting down
The East Ledges are fast but require care, and although you can get down them in an hour or two, when you know the way, I’ve known it takes nine! Treat the East Ledges with respect, and don’t be afraid to get the rope out. The crux is climbing down the final white slab/grooves to the top of the abseils (someone should stick a rope here before someone kills themselves). Once at the abseils, you can use the fixed ropes or your own, but be aware these ropes can be in poor condition (knots tied in them), so have the least heavily laden climber go first, and keep your ascenders handy (there is usually an up and down rope). The lower section of the East Ledges was wiped out by a big rockfall in 2016, and now has quite a lot of loose shite hanging around. Once you cross the stream bed, you’re safe, and now just have a ballache of a walk to the car park.
You can also walk out via the Yosemite Falls, which is very pretty, but your legs will not thank you once you’ve walked down 739 metres worth of steps, but it’s safe and worth doing at least once (just so you know how awful it is when you lie that it’s worth doing at least once).
Walking out the long way via Tamarack flats is another long, but flatter walk (when carrying a haul bag, even downhill feels like up), but you need to have a car at the end, or someone to pick you up (make sure the campsite road is open!). If you’re in a hurry or have a problem, then one option is to go down the East ledges with just a small load, then come back up the day after (you will need your ascenders), and get the bulk of it (it takes about 2 hours to walk back up), or walk-in via the Falls and back down the East Ledges.
So there you go, a ton of beta to add to all the other beta you’ve cribbed off the internet.